


The toughest thing about being a success is that you've got to keep on being a success—Irving Berlin
Microsoft Dynamics NAV (including the earlier Navision generation) has been a successful product line for over two decades. During the 2008-2009 fiscal year, Microsoft Dynamics NAV crossed the milestone of more than 1,250,000 installed users, a major achievement for any application software.
At the end of calendar 2008, Microsoft Dynamics NAV 2009 was released—a major new version of the product. While this new version contains the same business application functionality as the previous release (V5 Service Pack 1), it is based on a completely new infrastructure and presents a dramatically different face, the Role Tailored Client, to users. Our focus in this book is the NAV 2009 system, including the new three tier Role Tailored Client.
In this chapter, we will take a short tour through NAV 2009. Our path will be along the following trail:
NAV 2009 from a functional point of view as an ERP system
What's new in NAV 2009
Definitions of terms as used in NAV
The C/SIDE development environment and tools
A development introduction to the various NAV object types
Other useful NAV development information
Your goal in this chapter is to gain a reasonably complete, "big picture" understanding of NAV. When you complete this chapter, you should be able to communicate to a business manager or owner about the capabilities NAV can provide to help them manage their firm. This will also give you a context for what follows in this book.
A product as complex and flexible as NAV can be considered from several points of view. One can study the NAV application software package as a set of application functions designed to help a business manage information about operations and finances. One can also look at NAV as a stack of building blocks from which to extend or build applications—and the tools with which to do the construction.
In NAV 2009, which has two quite different user interface options available, one must consider how the user interface affects both the application design and the presentation to the user. This requirement overlaps both the application viewpoint and the construction viewpoint.
You should know the different object types that make up a NAV system and the purposes of each. You should also have at least a basic idea of the tools that are available to you, in order to enhance (small changes) or extend (big changes) an NAV system. In the case of NAV, the Integrated Development Environment (IDE) includes essentially all of the tools needed for NAV application development. Later in this book, we will discuss where the IDE can be supplemented.
Prior versions of NAV were two-tier systems. One of the tiers was the database server, the other tier was the client. As the traditional two-tier NAV Client (now referred to as the Classic Client) is still an integral part of the system, we will cover the aspects of where it must be used for development and support. All development and much of the system administration uses the Classic Client. So, even though our focus is on developing for the Role Tailored Client (aka "the RTC"), many of the images scattered throughout this book will be of Classic Client displays. In brief, the RTC is for users, and as a developer, you will generally use the Classic Client for your work.
If you look at NAV 2009 from the point of view of a firm using NAV to help run its business, you will see it as an integrated set of business applications software.
Microsoft Dynamics NAV is generally characterized as an ERP System. ERP stands for Enterprise Resource Planning. An ERP system is a set of integrated application software components designed to track and coordinate a wide variety of business activities, especially those involving products, orders, production and finances. An ERP system will typically include the following:
Basic accounting functions (for example, general ledger, accounts payable, accounts receivable)
Order processing and inventory (for example, sales orders, purchase orders, shipping, inventory, receiving)
Relationship management (for example, vendors, customers, prospects, employees, contractors, and so on)
Planning (for example MRP, sales forecasting, production forecasting)
Other critical business areas (for example, manufacturing, warehouse management, fixed assets)
The integration of an ERP system is supported by a common database, by an "enter once, use everywhere" data philosophy, by a modular software design, and with data extraction and analysis tools. The following image is a view of an ERP system from the highest level:

The design of Microsoft Dynamics NAV addresses all the points in the above description and more. The NAV ERP system includes integrated modules covering the breadth of business functions for a wide range of business types. These modules share a common database and, where appropriate, share common data.
In the NAV system, there is a considerable overlap of components across application areas, with individual functions showing up in multiple different "modules". For example, in NAV, Inventory is identified as part of Financial management, but it is also, obviously, an integral part of Manufacturing, Supply Chain, and others.
The particular grouping of individual functions into modules that follows is based on Microsoft marketing materials. Some of these assignments are a bit arbitrary. What's important is for you to obtain a reasonable understanding of the overall set of application components that make up the NAV ERP system. In several of the following groupings, menu screenshots are included as examples. These are from the Role Tailored Client Departments menu screen.
Financial Management is the foundation of any ERP system. No matter what the business is, the money must be kept flowing, and the flow of money must be tracked. The tools which help to manage the capital resources of the business are included in NAV's Financial Management module. These include all or part of the following application functions:

NAV Manufacturing is general purpose enough to be appropriate for Make to Stock (MTS), Make to Order (MTO), and variations such as Assemble to Order, and so on. While off-the-shelf NAV is not particularly suitable for most process manufacturing and high-volume assembly line operations, there are third party add-on and add-in enhancements available for these. As with most of the NAV application functions, manufacturing can be installed in parts or as a whole, and can be used in a simplistic fashion or in a more sophisticated manner. NAV Manufacturing includes the following functions:
Product design (BOMs and Routings)—managing the structure of product components and the flow of manufacturing processes
Capacity and supply requirements planning—tracking the intangible and tangible manufacturing resources
Production scheduling (infinite and finite),execution, and tracking—tracking the planned use manufacturing resources, both on an unconstrained and constrained basis

Obviously, some of the functions categorized as part of NAV Supply Chain Management (for example sales, purchasing, and so on) are actively used in almost every NAV implementation. As a whole, these constitute the base components of a system appropriate for a distribution operation. The Supply Chain applications in NAV include parts of the following applications:
Sales order processing and pricing—supporting the heart of every business—entering, pricing, and processing sales orders
Purchasing (including Requisitions)—planning, entering, pricing, and processing purchase orders
Inventory management—managing inventories of goods and materials
Warehouse management including receiving and shipping—managing the receipt, storage, retrieval, and shipment of material and goods in warehouses

Although Microsoft marketing materials identify Business Intelligence (BI) and reporting as though it were a separate module within NAV, it's difficult to physically identify it as such. Most of the components that are used for BI and reporting purposes are (appropriately) scattered throughout various application areas. In the words of one Microsoft document, "Business Intelligence is a strategy, not a product." Functions within NAV that support a Business Intelligence strategy include the following:
Standard Reports—distributed ready-to-use by end users
Report wizards—tools to create simple reports or foundations for complex reports
Account schedules and analysis reports—a very specialized report writer for General Ledger data
Analysis by dimensions—a capability embedded in many of the other tools
Interfaces into Microsoft Office including Excel—communications of data either into NAV or out of NAV
SQL server reporting services compatible report viewer—provides the ability to present NAV data in a variety of textual and graphic formats, includes user interactive capabilities
Interface capabilities such as Automation Controllers and web services—technologies to support interfaces between NAV 2009 and external software products
NAV Business Analytics—an OLAP cube based data analysis tool option
NAV's Relationship Management (RM) functionality is definitely the "little brother" (or, if you prefer, "little sister") to the fully featured standalone Microsoft CRM system. The big advantage of RM is its tight integration with NAV customer and sales data.
Also falling under the heading of Customer Relationship module is the NAV Service Management (SM) functionality. While the RM component shows up in the menu as part of sales and marketing, the SM component is identified as an independent function in the menu structure.
(RM) Marketing campaigns—plan and manage promotions
(RM) Customer activity tracking—analyze Customer orders
(RM) To do lists—manage what's to be done and track what's been done
(SM) Service contracts—support service business operations
(SM) Labor and part consumption tracking—track the resources consumed by the service business
(SM) Planning and dispatching—managing service calls
NAV Human Resources (HR) is a small module, but relates to a critical component of the business, the people. Basic employee data can be stored and reported via the master table (in fact, one could use HR to manage data about individual contractors in addition to employees). A wide variety of individual employee attributes can be tracked by use of dimensions fields.
Employee tracking—maintain basic employee description data
Skills inventory—inventory of the capabilities of employees
Absence tracking—maintain basic attendance information
EEOC statistics—tracking government required employee attribute data
The NAV Project management module consists of the jobs functionality supported by the resources functionality. Projects can be short or long term. They can be external (that is billable) or internal. This module is often used by third parties as the base for vertical market add-ons (for example, for construction or job oriented manufacturing). This application area includes parts or all of the following functions:
Budgeting and cost tracking—managing project finances
Scheduling—planning project activities
Resource requirements and usage tracking—managing people and equipment
Project accounting—tracking the results
Even though the NAV 2009 release doesn't contain any significant changes in the business application functionality, the changes in the infrastructure are major. We will discuss those briefly now and in detail in the later chapters.
The two-tier (Classic Client) system has all the business logic in the client (first tier) and the database management in the database (second tier). The database can either be the Classic C/SIDE database or a SQL Server database. This is the mode of all NAV releases until Version 2009. The three-tier system, new with NAV 2009, has the Role Tailored Client as the first tier (minimal logic), the NAV Service Tier as the second tier (where all the business logic now resides), and the SQL Server database as the third tier.
Both the two-tier and the three-tier configurations are shown in the following image. In both cases, the database is SQL Server (a stand-alone two-tier configuration could have a Classic NAV database server). The server tier performs the same role in both instances. For the two-tier configuration, the Classic Clients handle authentication, object management, presentation/rending, and the processing of all code, triggers, and validation.
For the three-tier configuration, the Role Tailored Clients are limited to some state tracking, simple data type validation and, of course, all the presentation and rendering for the new user interface. The NAV Service tier (NAV Servers) handles authentication, object management, the processing of all code, triggers and validation, plus offers web services support.
The following image illustrates a possible configuration of the NAV 2009 system. It has both the two-tier and three-tier options running in parallel. The three-tier option has multiple NAV Servers installed for capacity reasons (one NAV Server is projected to handle 40 to 60 users). Finally, the NAV Service tier is providing web services to support Internet-based access to the system from mobile devices.

The new Role Tailored Client (RTC) is quite different in look and feel from the Classic Client. The RTC brings with it a completely new approach to designing and coding for the user interface. As the name implies, the orientation of the new client is to present a user interface that focuses on the specific role of the individual user. We will spend quite a bit of time studying the design and development for the new client.
The new RTC supports reporting through the use of Visual Studio report designer and a Report Renderer/Viewer that replicates much of the functionality of SQL Server Reporting Services. RTC reports provide a host of new capabilities. RTC reports can be dynamically sorted in review (on-screen) mode, include graphics and expand (detail)/collapse (summary) displays, have drill-down and drill-through capabilities, and generate PDF or .xls (that is, Excel) files. We will spend quite a bit of time in Chapter 5, Reports, studying the Reporting Services for NAV 2009.
Web services is a new major feature of the NAV 2009 three-tier implementation. There isn't much to learn within NAV about web services because the implementation design is incredibly simple. Publishing a page or codeunit as a web service only requires a single record entry in the appropriate table.
Web services is very powerful, because it allows us to take advantage of the NAV Service Tier and expose NAV business logic, user authentication, and data access/validation to external processes. It is the new API for any application that has the ability to consume web services provided by another application.
If you look at NAV 2009 from the point of view of a developer, you may see it as a set of customizable off-the-shelf program objects (the building blocks) plus the IDE which allows you to modify those objects and create new ones (the C/SIDE development tools).
The NAV 2009 system is an object-based system, consisting of several thousand application objects, the building blocks, made up of the eight different object types available in NAV. NAV does not have all of the features of an object-oriented system. A full-featured object-oriented system would allow the definition and creation of new object types, while NAV only allows for the creation and modification of the predefined object types.
Let's start with some basic definitions of the object types that are part of NAV:
Form: Forms are the screen display constructs for the Classic Client user interface.
Page: Pages are the screen display constructs for the Role Tailored Client user interface. Pages are designed and rendered (displayed) using technology that is new to NAV 2009.
Report: Reports allow the display of data to the user in "hardcopy" format, either onscreen (preview mode) or via a printer device. Report objects can also update data in processes with or without accompanying data display output.
Dataport: Dataports allow the importing and exporting of data from/to external files in the Classic Client.
XMLport: XMLports are similar to Dataports. In the Classic Client, XMLports are specific only to XML files and XML formatted data. In the Role Tailored Client, XMLports handle the tasks of both XMLports and Dataports.
Codeunit: Codeunits are containers for code, always structured in code segments called functions.
MenuSuite: MenuSuites contain menus which refer in turn to other types of objects. MenuSuites are structured differently from other objects, especially since they cannot contain any code or logic. In the Role Tailored Client, MenuSuites are translated into Navigation Pane menu entries.
NAV includes a full set of software development tools. All NAV development tools are accessed through the C/SIDE Integrated Development Environment. This environment and its full complement of tools are generally just referred to as C/SIDE. C/SIDE includes the C/AL compiler. All NAV programming uses C/AL. No NAV development can be done without using C/SIDE.
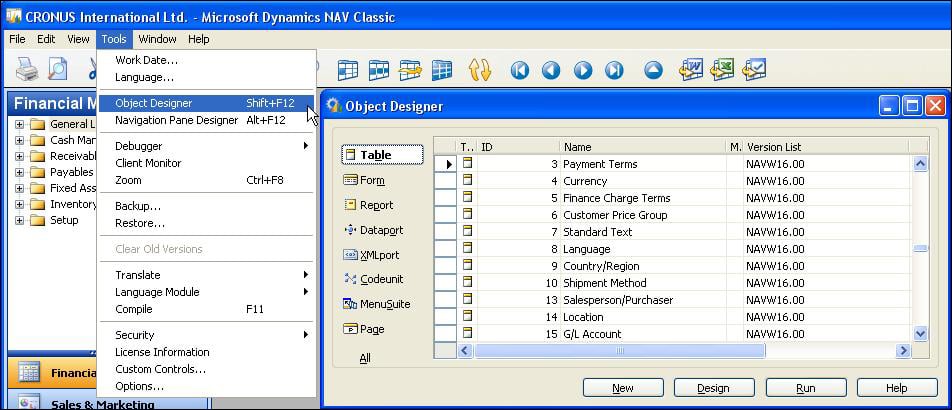
The C/SIDE Integrated Development Environment is referred to as the Object Designer within NAV. It is accessed through the Tools | Object Designer menu option as shown in the following screenshot:
The language in which NAV is coded is C/AL. A sample of some C/AL code is shown as follows. C/AL syntax has considerable similarity to Pascal. As with any programming language, readability is enhanced by careful programmer attention to structure, logical variable naming, process flow consistent with that of the code in the base product and good documentation both inside and outside of the code.
IF "No." = '' THEN BEGIN
 SalesSetup.GET;
 SalesSetup.TESTFIELD("Customer Nos.");
 NoSeriesMgt.InitSeries(SalesSetup."Customer Nos.",xRec."No. Series",0D,"No.","No. Series");
END;
IF "Invoice Disc. Code" = '' THEN
 "Invoice Disc. Code" := "No.";

IF NOT InsertFromContact THEN
 UpdateContFromCust.OnInsert(Rec);

DimMgt.UpdateDefaultDim(
 DATABASE::Customer,"No.",
 "Global Dimension 1 Code","Global Dimension 2 Code");
A large portion of the NAV system is defined by tabular entries, properties, and references. This doesn't reduce the requirement for the developer to understand the code, but it does allow some very significant applications development work to be done on a more of a point-and-choose or fill-in-the-blank approach than the traditional "grind it out" approach to coding. As we may mention more than once in this book, NAV gives developers the ability to focus on design rather than code. Much of the time, the effort required to create a new NAV application or modification will be heavily weighted on the side of design time, rather than technical development time. This long term goal for systems development tools has always been true for NAV. As the tools mature, NAV development continues to be more and more heavily weighted to design time rather than coding time.
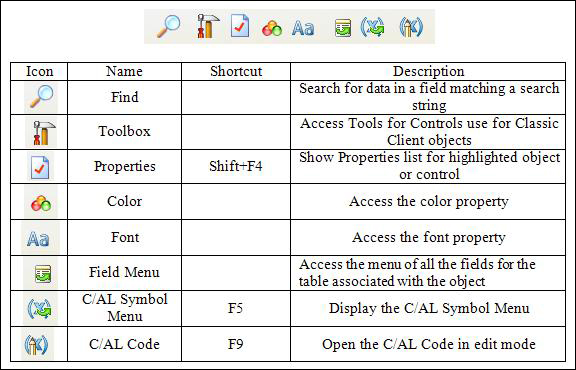
The following screenshot shows a list of Object Designer tool icons. These Object Designer icons are shown isolated in the screenshot and then described briefly in the following table. Some of these icons apply to actions that are only for objects which run in the Classic Client, some are for objects for both clients. Where appropriate, the terminology in these descriptions will be explained later in this book. Additional information is available in the C/SIDE Help files and the Microsoft NAV documentation.
The following table lists the specific development tools used for each object type. Also, as shown in this table, some objects are limited to being used in the Classic Client, some are limited to being used in the RTC environment, some are used in both, and some are interpreted differently depending on the environment in which they are invoked.
|
Object Type |
Design Tool |
User Interface |
Comments |
|---|---|---|---|
|
Table |
Table Designer |
Classic and RTC | |
|
Form |
Form Designer |
Classic | |
|
Page |
Page Designer |
RTC | |
|
Report |
Report Designer |
Classic (and RTC) |
If a report is run from the RTC but doesn't have an RTC compatible layout, NAV will run it under a temporary instance of the Classic Client |
|
Report Designer (data definition) + Visual Studio (user interface) |
RTC | ||
|
Dataport |
Dataport Designer |
Classic | |
|
XMLPort |
XMLport Designer |
Classic and RTC |
For the RTC, Dataport functionality is handled through appropriately defined XMLports |
|
Codeunit |
IDE code editor for the C/AL language |
Classic and RTC | |
|
MenuSuite |
Navigation Pane Designer |
Classic and RTC |
Much of the navigation in the RTC is done via Role Center pages rather than menus |
Let's take a look at the following:
Database: NAV has two physical database options. One is the C/SIDE Database Server; the other is the Microsoft SQL Server. The C/SIDE Database Server, formerly known as the "Native" database, only supports the two-tier client. The NAV 2009 three-tier functionality is only compatible with a SQL Server implementation. You won't be surprised to know that one or two product versions in the future, the only database option will be SQL Server.
At the basic application or code design levels, you don't care which database is being used. For sophisticated or high data volume applications you care a great deal about the underlying database strengths, weaknesses and features.
Properties: These are the attributes of the element (for example object, data field, or control) that define some aspect of its behavior or use. For example, attributes such as display length, font type or size, and if the elements are either editable or viewable.
Fields: These are the individual data items, defined either in a table or in the working storage of an object.
Records: These are groups of fields (data items) that are handled as a unit in most Input/Output operations. The table data consists of rows of records with columns consisting of fields.
Controls: These are containers for constants and data. A control corresponds to a User Interface element on a form/page or a report. The visible displays in reports and forms consist primarily of controls.
Triggers: The generic definition is a mechanism that initiates (fires) an action when an event occurs and is communicated to the application object. A trigger is either empty or contains code that is executed when the associated event fires the trigger. Each object type has its own set of predefined triggers. The event trigger name begins with the word "On" such as
OnInsert, OnOpenPage, andOnNextRecord. NAV triggers have some similarities to those in SQL, but they are not the same. NAV triggers are locations within the various objects where a developer can place comments or C/AL code.When you look at the C/AL code of an object in its Designer, the following have a physical resemblance to the NAV event based triggers:
Documentation which can contain comments only, no executable code. Every object type except MenuSuite has a single Documentation section at the beginning.
Functions which can be defined by the developer. They represent callable routines that can be accessed from other C/AL code either inside or outside the object where the called function resides. Many functions are provided as part of the standard product. As a developer, you may add your own custom functions as needed.
Object numbers and field numbers: The object numbers from 1 (one) to 50,000 and in the 99,000,000 (99 million) range are reserved for use by NAV as part of the base product. Objects in this number range can be modified or deleted, but not created with a developer's license. Field numbers are often assigned in ranges matching the related object numbers (that is starting with 1 for fields relating to objects numbered 1 to 50,000, starting with 99,000,000 for fields in objects in the 99,000,000 and up number range). Object and field numbers from 50,001 to 99,999 are generally available to the rest of us for assignment as part of customizations developed in the field using a normal development license. But object numbers from 90,000 to 99,999 should not be used for permanent objects as those numbers are often used in training materials. Microsoft allocates other ranges of object and field numbers to Independent Software Vendor (ISV) developers for their add-on enhancements. Some of these (in the 14,000,000 range in North America, other ranges for other geographic regions) can be accessed, modified, or deleted, but not created using a normal development license. Others (such as in the 37,000,000 range) can be executed, but not viewed or modified with a typical development license. The following table summarizes the content as:
Object Number range
Usage
1 9,999
Base-application objects
10,000 49,999
Country-specific objects
50,000 99,999
Customer-specific objects
100,000 98,999,999
Partner-created objects
Above 98,999,999
Microsoft territory
Work Date: This is a date controlled by the operator that is used as the default date for many transaction entries. The System Date is the date recognized by Windows. The Work Date that can be adjusted at any time by the user, is specific to the workstation, and can be set to any point in the future or the past. This is very convenient for procedures such as ending Sales Order entry for one calendar day at the end of the first shift, and then entering Sales Orders by the second shift dated to the next calendar day. You set the Work Date in the Classic Client by selecting Tools | Work Date (see following screenshot).

In the Role Tailored Client, you can set the Work Date by selecting Microsoft Dynamics NAV | Set Work Date, and then entering a date (see following screenshot).

License: A data file supplied by Microsoft that allows a specific level of access to specific object number ranges. NAV licenses are very clever constructs which allow distribution of a complete system, all objects, modules, and features (including development) while constraining exactly what is accessible and how it can be accessed. Each license feature has its price. Microsoft Partners have access to "full development" licenses to provide support and customization services for their clients. End-user firms can also purchase licenses allowing them developer access to NAV.
For various application functions, NAV uses terminology that is more akin to accounting terms than to traditional data processing terminology. Some examples are:
Journal: A table of transaction entries, each of which represents an event, an entity, or an action to be processed. There are General Journals for general accounting entries, Item Journals for changes in inventory, and so on.
Ledger: A detailed history of transaction entries that have been processed. For example, General Ledger, a Customer Ledger, a Vendor Ledger, an Item Ledger, and so on. Some Ledgers have subordinate detail ledgers, typically providing a greater level of date plus quantity and/or value detail.
Posting: The process by which entries in a Journal are validated, and then entered into one or more Ledgers.
Batch: A group of one or more Journal entries that were posted in one group.
Register: An audit trail showing a history, by Entry No. ranges, of the Journal Batches that have been posted.
Document: A formatted report such as an Invoice, a Purchase Order, or a Check, typically one page for each primary transaction.
The terms two-tier versus three-tier and Classic Client versus Role Tailored Client have come up several times already in our discussion of NAV 2009. Let's initially focus on the user look and feel differences, and what that means to you when designing an application.
Following is a sample of what the Classic Client (two-tier) user interface looks like. Note that if the login were for a user with limited access privileges, only the permitted menu options would be displayed. Nevertheless, the basic structure of the display is oriented around the structure of the database and the traditional technician viewpoint of how the system works.

Now let's take a look at the appearance of the Role Tailored Client. The same comment applies about the system displaying only the permitted functions. However, the basic structure of the display here is oriented around a definition of the Role (and therefore the tasks) of the specific user who has logged in. Someone whose role centers around Order Entry will see a different RTC home page than the user whose Role centers around Invoicing, even though both are primarily focused in what we used to think of more globally as Sales & Receivables.

Obviously the user look and feel has changed dramatically from the Classic Client to the RTC. The design approach for our enhancements must follow the new RTC style. In some ways this will be a more challenging task, especially for those of us who are purely technical developers without much knowledge of the individual user's point of view.
In order to do a good job of fitting the system to a particular customer, we must have a good understanding of the duties performed by different roles within that customer's organization. This means we need more diagnostic effort at the frontend of our system design and implementation planning. Perhaps we should always have done that, but since our design model was based on how our product worked, rather than how the customer's operation worked, we could get away with doing less. No more. It's not within the scope of this book to discuss that diagnostic effort in any detail. Nevertheless, it is very important that it be done and done well. In this book, we will concentrate on how to address the requirements for Roles once they are defined.
As part of our study of NAV development tools and techniques, we are going to do some exercises here and there. There's no better way to learn than to try out the tools in an environment where you can't break anything important. We're going to do development work for a simple system. As discussed earlier, we will access C/SIDE through the Tools | Object Designer menu option, as shown in the following screenshot:

Our organization is a small, not-for-profit one. The name is ICAN, which stands for International Community And Neighbors. We collect materials, mostly food, from those who can afford to share and distribute it to those who have difficulty providing for themselves or their families. A large company has supplied us with a small computer network and a three-user Microsoft Dynamics NAV 2009 system.
We need to track the donations which come in. They may be items, money, or some type of in-kind services. If they are items, we will need to inventory them. We also need to track donors, volunteers, and the people on our "help list" (our clients). A variety of reports and inquiries will be needed. As with any application, new requirements are likely to arise as time goes by. And, in this case, since the purpose of our scenario is to act as a laboratory for experimenting with NAV development tasks, new requirements will arise so that we can do additional experiments.
Our design for the ICAN application will start with the initial design of a Donor table, a Donor Card Page, a Donor List Page, and a Donor List Report. Along the way, we will review the basics of each of these NAV object types.
Table objects are the foundation of every NAV application. Every project should start by designing the tables. Tables contain the definitions of the data structures, the data relationships within and between the tables, as well as many of the data constraints and validations.
The coded logic in a table triggers not only provides the basic control for the insertion, modification, and deletion of records, but also embodies many of the business rules for an application. Such logic isn't just at the record level but also at the field level. When we embed a large part of the application data handling logic within the tables, it makes the application easier to develop, debug, support, modify, and upgrade.
Let's create a simple Donor table for our NAV Donor application. First, we will inspect existing definitions for tables containing name and address information. Basic inspection is done by clicking on the Tables button in the Object Designer, then highlighting the desired table and clicking the Design button. Good examples are the Customer table (table object 18) and the Vendor table (table object 23).
We see some field name and definition patterns that we will generally copy on the basis of "consistency is good". One exception to the copying will be the Primary Key field. In the other tables, that field is No., but we will use Donor ID, just to make all our examples stand out from views of standard code.
The Donor table will contain the following data fields:
|
Field names |
Definitions |
|---|---|
|
Donor ID |
20 character text (code) |
|
Name |
50 character text |
|
Address |
50 character text |
|
Address 2 |
50 character text |
|
City |
30 character text |
|
State/Province |
10 character text |
|
Post Code |
20 character text (code) |
|
Country/Region Code |
10 character text (code) |
In the preceding data field list, three of the fields are defined as Code fields, rather than Text fields. This is because these will be referenced by or will reference to other data tables. Using Code fields limits the contents to a subset of the ASCII character set, making it easier to constrain entries to a range of values. Code fields will be discussed in more detail in Chapter 3, Data Types and Fields for Data Storage and Processing.
The Donor ID will be a unique identifier for our Donor record as it will also be referenced by other subordinate tables. The Post Code and Country/Region Code will reference other existing tables for validation. We choose the name, size, and data definition of these last two fields based on inspecting the equivalent field definitions in the Customer and Vendor tables.
We will have to design and define any referenced validation tables before we can eventually complete the definition of the Donor table. But our goal at the moment is just to get started.
Open the Object Designer, click on Table (in the left column of buttons) and click on New (in the bottom row of buttons). Enter the first field name (Donor ID) in the Field Name column and then enter the data type in the Data Type column. For those data types where length is appropriate, enter the maximum length in the Length column (for example text fields require lengths, date or numeric fields do not). Enter Description data as desired; these are only for display here as internal documentation.
As you can see in the following screenshot (and will have noticed already if you are following along in your system), when you enter a Text data type, the field length will default to 30 characters. This is simply an 'ease-of-use' default, which you should override as appropriate for your design. The 30 character Text default and 10 character Code default are used because this matches many standard application data fields of those data types.

The question often arises as to what field numbering scheme to use. Various systems follow a variety of standard practices, but in NAV, when you are creating a new table from scratch, it is a good idea to increment the Field No. by 10, as you can see in the preceding screenshot. The default increment for Field No. is 1. For a group of fields (such as an address block) where you are certain you will never add any intervening fields, you could leave the increment at 1, but there is no cost for using the larger increment.
The numeric sequence of fields determines the default sequence in which data fields will display in a wide variety of situations, especially in the Classic Client. An example would be the order of the fields in any list presented to the user for setting up data filters in the Classic Client. This default sequence can only be changed by renumbering the fields. The compiler references each field by its Field No. not by its Field Name, so the renumbering of fields can be difficult once you have created other routines that reference back to these fields. At that point, it is generally better to simply add new fields where you can fit them without any renumbering.
In fact, it can be irritatingly painful to renumber fields at any point after a table has been defined and saved. In addition to the field numbers controlling the sequence of presentation of fields, the field numbers control bulk data transfer (those transfers that operate at the record level rather than explicitly field to field transfer—for example the TRANSFERFIELD instruction). In a record-level transfer, data is transferred from each field in the source record to the field of the same number in the target record.
Obviously, it's a good idea to define an overall standard for field numbering as you start. Doing so makes it easier to plan your field numbering scheme for each table. Your design will be clearer for you and your user, if you are methodical about your design planning before you begin writing code (try to avoid the Ready-Fire-Aim school of system development). The increment of Field No. by 10 allows you to insert new fields in their logical sequence as the design matures. While it is not required to have the data fields appear in any particular order, it is frequently convenient for testing and often clarifies some of the user interactions.
When you have completed this first table, your definition should look like the following screenshot:

At this point, you can exit and save your Donor Table. The easiest way to do this is to simply press Esc until you are asked to save your changes.

When you respond by clicking on Yes, you will be asked for the object number and name you wish to assign. In a normal development situation, you will plan ahead what Object Number and descriptive Object Name you want to use.
In this case, we will use table Object No. 50000 and name it Donor. We are using 50000 as our Table Number just because it is the first (lowest) number available to us for a custom table through our Table Designer granule license.

Note that NAV likes to compile any object as it is saved, so the Compiled option is automatically checked. A compiled object is one that can be executed. If the object we were working on was not ready to be compiled without error, we could unselect the Compiled option in the Save As window, as shown in the preceding screenshot.
Note
Be careful, as uncompiled objects will not be considered by C/SIDE when changes are made to other objects. Until you have compiled an object, it is a "work in progress", not an operable routine. There is a Compiled flag on every object that gives its compilation status. Even when you have compiled an object, you have not confirmed that all is well. You may have made changes that affect other objects which reference the modified object. As a matter of good work habit, recompile all objects before you end work for the day.
Pages are for the Role Tailored Client. Forms are for the Classic Client. If you are in the challenging position of maintaining a dual personality system (that is, running both clients), you will be forced to maintain equivalent versions of both Pages and Forms. We aren't going to address that situation in depth in this book as we are not going to cover the design and development of Forms in detail. In this book, we will focus on Pages and cover Forms just enough so that you can create a few to use as maintenance and debugging tools.
Note
If you also need in-depth exposure to the world of developing for the Classic Client, you should refer to Programming Microsoft Dynamics NAV, Packt Publishing, (visit www.packtpub.com) about NAV development for the Classic Client. That book is based on NAV V5.0 SP1, but is fully applicable to NAV 2009 Classic Client development.
Pages fulfill several basic purposes. They provide views of data or processes designed for on-screen display only. They provide key points of user data entry into the system. They also act as containers for action items (menu options). The first page with which a user will come in contact is a Role Center Page. The Role Center Page provides the user with a view of work tasks to be done. The Role Center Page should be tailored to the job duties of each user, so there will be a variety of Role Center Page formats for any firm.

There are several basic types of display/entry pages in NAV:
List pages
Card pages
Document pages
Journal/Worksheet pages
There are also page parts (they look and program like a page, but don't stand alone) as well as user interfaces that appear as pages, but are not Page objects. The latter user interfaces are generated by various dialog functions.
List pages display a simple list of any number of records in a single table. The Customer List page in the following screenshot shows a subset of the data for each customer displayed. The Master record list shows fields intended to make it easy to find a specific entry. List pages/forms often do not allow entry or editing of the data. Journal/Worksheet pages look like List pages, but are intended for data entry.

Card pages display one record at a time. These are generally used for the entry or display of individual table records. Examples of frequently accessed card pages include Customer Card for customer data, Item Card for inventory items, and G/L Account Card for general ledger accounts.
Card pages often have FastTabs (multiple pages with each tab focusing on a different set of related customer data). FastTabs can be expanded or collapsed dynamically, allowing the specific data visible at any time to be controlled by the user.
Card pages for Master records display all the required data entry fields. Typically, they also display summary data about related activity so that the Card page can be used as the primary inquiry point for Master records. The following screenshot is a sample of a standard Customer Card:

Another page style within NAV consists of what looks like a Card page plus a List page. An example is the Sales Order page as shown in the following screenshot. In this example, the upper portion of the page is in the style of a Card page with several tabs showing Sales Order data fields that have a single occurrence on the page (in other words, do not occur in a repeating column). The lower portion of the Document page is in the style of a List page showing a list of all the line items on the Sales Order (all fields are in repeating columns).
Line items may include product to be shipped, special charges, comments, and other pertinent order details. The information to the right of the data entry is related data and computations that have been retrieved and formatted. On top of the page, the information is for the Ordering customer and the bottom right contains information for the item on the selected line.

Journal and Worksheet pages look very much like List pages. They display a list of records in the body of the page. Many have a section at the bottom that shows details about the selected line and/or totals for the displayed data. These pages may also include a Filter pane and perhaps a FactBox. The biggest difference between Journal/Worksheet pages and basic List pages is that Journal and Worksheet pages are designed to be used for data entry. An example of a Worksheet page, the Requisition Worksheet in Purchasing, is shown in the following screenshot. This Worksheet assists the user in determining and defining what purchases should be made.

A page consists of Page properties and triggers, Controls, Control properties and triggers. Data controls generally are either labels displaying constant text or graphics, or containers that display data or other controls. Controls can also be elements such as buttons, action items, and page parts. While there are a few instances where you must include C/AL code within page or page control triggers, in general it is good practice to minimize the amount of code embedded within pages. Most of the time, any data-related C/AL code can (and should) be located within the table object rather than the page object.
Let us try creating a Card page and a List page for the table we created earlier. The NAV IDE contains object generation tools (Wizards) to help you create relatively fully formed Classic Client forms and reports. Creating pages and reports for the Role Tailored Client is less about Wizards and more about actually using the Designer tools, but the Wizards are still very useful.
Open the Object Designer, click on Page and then click on New. The Page Wizard's screen will appear. Enter the name (Donor) or number (50000) of the Table with which the page is to be associated (bound). Choose the option Create a page using a wizard:. Choose Card as shown in the following screenshot. Click on OK.

Next, you will encounter the following Card Page Wizard screen:

As this is our first Page creation effort, we will keep it simple. We will accept the single suggested FastTab of General and click on Next to proceed. That will take us to the following screen.

Now it's time to add all the data fields for our Donor table to the page. Click on the button shown in the following image. That will move all of the Available Fields to the Field Order window.

Now click on the Finish button. The Page wizard will close and you will be looking at the Page Designer form showing the generated page code, as shown in the following screenshot.

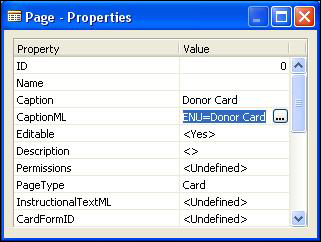
Place your cursor on the first blank line at the bottom of the list of control definitions. Right-click and select Properties to open the Page-Properties screen as shown below (you could also press Shift + F4 or click on the Properties icon at the top of the screen). Type the page name to be displayed "Donor Card" into the Caption field, it will default into the MLCaption field too, as follows:
Escape from that screen, and Escape from the Page Designer screen.
A Save Changes form will be displayed, just like the one we saw when we finished defining our Donor table. We have the same task now as we did then, to assign an ID (object number) and Name. Let's make this Page number 50000 and call it Donor Card. Leave the Compiled checkbox checked and click on OK so that the Page will be compiled (and error checked). Assuming you haven't received any error messages, you have now created your first NAV 2009 page object. Congratulations!
If you are doing your work with the original release of NAV 2009, you have to test a new card page by running it from the system Run option. From the Start menu, select Run. In the command box, enter the following:
Dynamicsnav:////runpage?page=50000
If you are using NAV 2009 SP1 or later, you can test your page by simply highlighting it and clicking on the Run button at the bottom of the Object Designer screen (the Run button is programmed to automatically submit that long command to the system).
This will invoke the Role Tailored Client, open it up, and call up your new page 50000. You should see a screen that looks like this.

Experiment a little. Expand the card page to full screen. Enter some Donor data for two or three donors (hint: click on the Actions icon at the top of the page and choose the New option). You might want to open the page with the Page Designer using the Design button, add one of the data fields so it will appear a second time on the card. This time, change the Caption field for that data item. Save and compile. Run a test. Before you quit experimenting, go back and remove any extras that you had added, so that later your Donor Card will be what we created initially.
You could create a second copy of the page so that you could experiment, then discard it later. First, open Page 50000 in Design mode. Then click on File | Save As and save the page object as Page number 50090 with a different name such as Test Donor Card. Compile it, then make whatever changes you want, deleting the experimental page when you are done experimenting.
When you begin testing, you will find that a lot of features have been created automatically as part of the Card page, but you are still very limited in what you can do. For example, without a properly set up List Page, it's harder to move around in your table and quickly find different Donors, especially if there are more than just a few records in the table. This difficulty would be even more significant for your users. That's why List pages are the primary data navigation interface in the application system. So let's create a List page for our Donor table.
The process of creating a Donor List page is essentially the same as the one we just went through for the Donor Card page. Open the Object Designer, click on Page, and then click on New. The Page Wizard's first screen will appear. Enter the name (Donor) or number (50000) of the table with which you want the page to be associated. Choose the option Create a page using a wizard:. Choose List and click on OK.
You will see a List Page Wizard form that looks just like the second screen you encountered when you were creating a Card page. Unlike the Card page, we will use the single field selection button (>) to choose just the four individual fields we want to appear in our List page. The image below shows which fields to choose.

Now click on the Finish button. The Page wizard will close and you will be looking at the Page Designer form showing the generated material.

Place your cursor on the first blank line at the bottom of the list of fields, right-click, then select Properties. Type the page name to be displayed "Donor List" in the Caption field, it will default into the MLCaption field too. In that same property list, in the CardFormID field, enter the name (or ID number) of the Card page that should be used to display any entry that will be displayed on this List page. In this case, that will be Donor Card.
After you've made your property entries, the Page Properties form will look like the following screenshot:

In the Classic Client, the Card form is the first point of contact with the information in a table. When you invoke the List form from the Card form, a property on the table determines what List form is activated. In the RTC, the List page is the first point of contact with the information in a table. When you invoke the Card page from the List page, the CardFormID property determines what Card page to activate.
We can always return to the created page in the Page Designer and easily add fields we left off or remove something we decide is not needed. In addition, NAV list pages include a feature that allows you to have some field columns with the Visible property set to FALSE initially. This property is field specific, controls whether the column for a data field displays on screen or not, and can be personalized by users.
In order to save and compile the new page, just press Esc key and respond with Yes to the Save Changes form. Enter the Page number (ID) you want to assign (use 50001) and name (use Donor List). If you reused the Page object number 50000, you would have overwritten the Card page you created earlier.

At this point, we have a data structure (Table 50000—Donor), a page to enter and maintain data, (Page 50000—Donor Card) and a page to display or inquire into a list of data (Page 50001—Donor List). Let us use our Donor List and Donor Card to enter some data into our table, edit it, and review it.
In a full application, we would be accessing our pages from a Role Center page. But for now, we will just test our pages directly through the Run option. This will invoke the Role Tailored Client, open it up and call up page 50001. You should see a screen that looks like this:

Notice the New command icon that has been included on the Action pane for your new page. That was provided automatically, without you needing to code it. Very convenient. Click on New. Your Donor Card page will open up in Add mode. Now is a good time to create some elementary test data. Enter the data for a Donor. Click on OK. Your new Donor record is displayed in the Donor List page. Hopefully you're having a good time, after all, success is enjoyable, even in small amounts.
Click on New again. Enter another Donor test record. This time, instead of clicking on the OK button, click on the option symbol (the inverted triangle) at the right of the button. You will see that you have two entry completion options.

If you simply click on OK or you press Ctrl + Enter, the control will return to the list page. But if you click on the OK & New option, the record just entered will be saved and you will return to an empty New Card page ready for the next record to be entered. Obviously, this second option is handy for situations requiring repetitive data entry.
After you have entered two or three Donor entries, go back to the Donor List page. Highlight one of the Donor entries, then double-click it. You will end up back in the Donor Card page in Edit mode with the highlighted Donor record loaded, ready to be changed. Change it and then click on OK. You return to the Donor List page with the Donor record updated with your changes similar to what's shown in the following screenshot:

Before we move on to creating a simple report, let's take a quick look at the list of keyboard shortcuts that are available in NAV 2009. From the RTC, call up Microsoft Dynamics Help. Use Search to find Keyboard Shortcuts. This will give you a list of the many keyboard shortcuts that are available within the Role Tailored Client.
Change focus to the Classic Client, where you've been doing your development work. Access the Help menu option in the header. Choose Overview of F Keys. This will display a list of the common keyboard shortcuts used within the Classic Client. You will see that this list of shortcuts is totally different from the one in the RTC (and much shorter). This is because there was a Microsoft product management decision to have NAV keyboard shortcuts more like those in Microsoft Excel. You have the challenge of remembering two sets of shortcuts in the same system and using the right ones at the right time.
Hopefully, you are beginning to get a feeling for the ease of use and power of C/SIDE and NAV. Let's return to the Object Designer in the Classic Client. You've been viewing the Donors through the normal pages in the same manner as would a user, through the application Pages. As you have access to the Object Designer, you can also inspect, even manipulate data directly within the table. Simply access the Table Designer again, highlight the Donor table (50000) and Run the table.

Running a table creates a default Classic Client form that includes all the displayable fields in the table. Now you can see the same Donor records you just entered. Dependent on the specific design of the table (about which you will learn more in subsequent chapters), you can freely modify the contents of the table.
Report objects can be used for several purposes, sometimes more than one purpose at a time. One purpose is the display of data. This can be on-screen (called Preview mode) or output to a printer device driver (Print mode). The displayed data may be read from the database, or may be the result of significant processing. As you would expect, a report may be extracting data from a single table (for example, a list of customers) or a combination of several tables (for example, a sales analysis report).
Other report objects have the purpose of only processing data, without any display formatted output of the processed results. Typically, such reports are referred to as batch processing reports. Reports can also be used as containers for program logic to be called from other objects or executed as an intermediate step in some sequence of processes. Normally, this task would be handled by Codeunit objects, but you can also use report objects if you want to.
Report formats are limited to a combination of your imagination, your budget, and the capabilities of NAV reporting. NAV reporting is very powerful and flexible in terms of what data can be reported, plus the various types of filtering and combining can be done. In the Classic Client, NAV reporting is relatively limited in terms of formatting. However, reports designed to be run in the Role Tailored Client use RDLC capabilities similar to those available from SQL Server Reporting Services. Consequently, they have a great deal of flexibility.
One standard way to create a new Role Tailored Client report is to create a report for the Classic Client, and then "transform" it (an embedded process that converts an object for the RTC) and then reformat it for the RTC. It may seem a roundabout method, but, depending on the report, it's sometimes the easiest approach. If it so happens that you prefer to only create the report in the Classic Client format, the RTC will run that one too, but without any of the new RTC report features.
Common report formats in NAV (both clients) include document style (for example Invoices or Purchase Orders), list style (for example, Customer List, Inventory Item List, Aged Accounts Receivable), and label format style (for example, a page of name and address labels). There is only one Report object. It can contain formatting layout information for only the Classic Client or for both the Classic and Role Tailored Clients. From a practical point of view, if you are going to run a report only from the RTC, the Classic Client format information can be very minimal (that is not particularly useful for Classic Client reporting).
A significant aspect of the NAV report object is the built-in "read-then-process" looping structure, which automates the sequence of "read a record, process the record, then read the next record". When manually creating or enhancing reports, you can define one data structure as subordinate to another, thus creating nested read-then-process loops. This type of predefined structure has its good points and bad points. The good points usually relate to how easy it is to do the kind of things it is designed for and the bad points relate to how hard it is to do something that the structure doesn't anticipate. We will cover both sides of discussion when we cover Reports in detail in Chapter 5, Reports.
We've taken a quick look at normal RTC data entry and viewing and we've looked at how the data is defined in the table. We will now look at how that data might be extracted and reported.
First, we will create a simple list format report based on our Donor table. We will use the Report Wizard. The Report Wizard is quite useful for simple reports. The Report Wizard and Report Designer tools are available to anyone who has a license containing the Report Designer granule.
When you are doing more complex reports, it is often only modestly helpful to start with the Report Wizard. For one thing, the Report Wizard only deals with a single input table. However, even with complex reports, sometimes it is a good idea to create a limited test version of some aspect of a larger report. Then you may create your full report without use of the Wizard, but using the Report Wizard generated code as your model for some aspect of layout or group totaling.
Open the Object Designer, click on Report, and then click on New. The Report Wizard's first screen will appear. Enter the name (Donor) or number (50000) of the table with which you want the report to be associated. Choose the option Create a report using a wizard. This time choose a Tabular-Type Report Wizard to create a Donor List. Then click on OK, as shown in the following screenshot:

Next, you will be presented with the window shown in the following screenshot for choosing what data fields you want on your report. This is very much like what we saw earlier in the Page Wizard. The order in which you place the fields in the Field Order column, top to bottom (as shown in the following screenshot), will be the order in which they appear on your report, left to right.

You can preview your report in the Classic report viewer during the process of its creation, to see if you are getting the layout you want. Often you will perform quite a bit of manual formatting after you finish with the Wizard. As the report preview function utilizes the driver for the current default printer for formatting, make sure you have a default printer active and available before you attempt to preview an NAV report.
After you have chosen the fields you want on your report (some are suggested in the preceding screenshot), click on Next. This will bring up a screen allowing you to predefine a processing/printing sequence for this report. You can select from any of the defined keys. At the moment our Donor table only has one key so let's choose the No, I don't want a special sorting of my data. As you will see later, that will generate a report where you can choose the sort sequence for each run. Click on Next.
Now you can choose a List Style or a Document Style layout. Click on each one of them to get an idea of the difference. If you like, Preview the report in process for each of these options chosen. Note that when you Run a report (and previewing it, is running it), the first thing you see is called the Report request screen. A default Report request screen from the Donor List report would look like the following screenshot:

The Report request screen is where the user enters any variable information, data filters, page, printer setups, and desired sort order to control each report run. If no key is selected for the report, the Sort button will appear at the bottom right of the screen. This allows the user to choose which data key will apply to a report run. The user can also choose to Print the report (output to a physical device or PDF file) or Preview it (output to the screen). To start with, just click on Preview to see your current layout.
Once you are satisfied with the layout, click on Finish. You will now be in the Report Designer, ready to make manual changes. Exit the Report Designer by pressing the close-window icon, saying Yes, you do want to save changes. Save your new report as ID 50000 and Name "Donor List". Run your new report, using the Object Designer Run button. It should look much like the following:

Our next step is to transform the Classic Client report layout into an RTC (RDLC) report layout. Highlight Report 5000 and click on Design. Then click on Tools | Create Layout Suggestion (see the following screenshot).

Your system will whirr and hum and buzz and a display similar to the following will appear:

You have been transported along with your transformed report layout into the Microsoft Visual Studio Report Layout tool. This tool gives you access to a considerable variety of graphical effects, interactive reporting functions, and other capabilities. We will explore these in detail in Chapter 5, Reports.
While you could make many different changes to this layout, for now just exit Visual Studio via the Esc key. As you exit Visual Studio, you will be presented with the following question on screen:

Click on Yes, which will take you back to the Classic Report Designer. Exit from the Report Designer, saving your revised report the same way you saved the original earlier.
By the way, if you had made changes to your layout and saved them, then later invoked the Create Layout Suggestion again, that would overwrite your layout, changes, and all. After the first time, access to this tool for a report should be via View | Layout.
In order to test the new RTC version of the Donor List report, simply highlight the report line in the Object Designer and click on Run. The RTC Report Request Screen will display, looking like the following screenshot:

Preview the report. It should look very similar to the following screenshot:

As you can see, the Classic Client report and the RTC report look similar, but not the same. The goal with the new client was not to replicate the old client, but to provide similar functionality so that almost all capabilities were retained, but with many new capabilities being available.
There is a lot more to learn about the design, creation, modification, and control of Reports. All we have done so far is scratch the surface. But if you're following along in your own system, especially if you've done a little experimenting of your own along the way, you now have a pretty good overview of what it feels like to begin developing in NAV 2009.
We are done with our introduction to development for now. We will continue with our introductory review of NAV's object types.
A codeunit is a container for "chunks" of C/AL code to be run "inline" or called from other objects. These "chunks" of code are properly called Functions. As we said earlier that you could use a Report object as a container for code segments (that is, functions), why do we need codeunits? One reason is that early in the life of C/SIDE, only codeunits could be used in this way. Somewhere along the line, the C/SIDE developers decided to relax that particular constraint. However, from a system-design point of view, there are very good reasons to use codeunits as the primary containers for functions.
The most important reason to put all callable functions within codeunits is that codeunits can be exposed as Web Services. This allows the functions within a codeunit which has been published as a Web Service to be invoked by external routines operating outside of NAV. Only codeunits and pages can be exposed as Web Services.
A second important reason for using codeunits for callable functions is that the Microsoft provided NAV license specifically limits access to the C/AL code within codeunits differently than that within reports. The C/AL code within a report can be accessed with a "lower level" license than is required to access the C/AL code in a codeunit. If your customer has license rights to the Report Designer, they can access C/AL code within Report objects. A large percentage of installations have Report Designer license privileges. But they cannot access C/AL code within codeunit objects unless they have access to a more expensive license with Developer privileges (that is Application Builder or Solution Developer). As a result, C/AL code within codeunits is more secure from casual changes than is C/AL code within report objects.
A third reason is that the codeunits are better suited structurally to contain only functions. Even though functions could be placed in other object types, the other object types have superstructures that relate to their designed primary use for forms, reports, and so on. The use of such an object primarily as a repository for functions designed to be called from other objects creates code that is often more difficult to interpret, use, and maintain.
Codeunits act only as a container for C/AL coded functions. They have no auxiliary functions, no method of user interaction, and no pre-defined processing. If you are creating one or two functions that are closely related to the primary activity of a particular report, but these functions are needed from both within and outside of the report, then, by all means, include the functions in the report. Otherwise, use a Codeunit.
There are several codeunits delivered as part of the standard NAV product, which are really function libraries. These codeunits consist totally of utility routines, generally organized on some functional basis (for example, associated with Dimensions or with some aspect of Manufacturing or some aspect of Warehouse management). Some developers create their own libraries of favorite special functions and include such a "function library" codeunit in systems on which they work.
If a Codeunit is structured very simply and can operate in a stand-alone mode, it is feasible to test it in the same way one would test a Report or a Page. Highlight the Codeunit and click on the Run button. The codeunit will run for a single cycle.
MenuSuites are the objects that are displayed in the Classic Client as User Menus. They differ considerably from the other object types we have discussed earlier. MenuSuites have a completely different structure; they are also maintained differently. In older versions of NAV, menus were constructed as versions of Form objects. With the release of Version 4.0, MenuSuites were offered as a way of providing a User Interface essentially similar to that found in the Outlook Navigation panel. This is the way they appear in the Classic client. MenuSuites are also maintainable in a limited way by the end user without any special license requirements. In addition, MenuSuites have the advantage of only showing the menu items that the user has permissions to access.
MenuSuite entries do not have maintainable properties or contain triggers. Within MenuSuites, NAV developers lost the ability to embed C/AL code within the menus. The only customizations that can be done with MenuSuites is to add, delete, or edit menu entries.
In the Role Tailored Client the data in the MenuSuites object is presented in the Department Menus. As you might expect, the presentation of the information is different in the RTC. In a later chapter, we will discuss more about how to work with MenuSuites and how to work around some of the constraints. The Role Center provides us with a number of new capabilities in that regard.
Dataports exist as separate object types only in the two-tier (Classic) client. In the Role Tailored Client, the functions handled by Dataports in the Classic Client are handled by XMLports.
Dataports are specialized objects designed to export and import data between the two-tier NAV database (whether Classic or SQL Server) and external text files. Dataports allow for a limited set of external data formats, generally focused around what are commonly referred to as "comma separated value" (also known as "comma-delimited" or csv) files. The delimiters don't actually have to be commas, that's just the common name for this file structure.
Dataports can contain C/AL logic that applies to either the importing or the exporting process (or both). The internal structure of a dataport object is somewhat similar to that of a report object combined with a table object. Dataports are driven by an internal read-then-process loop similar to that in reports. Dataports contain field definitions that relate to the specific data being processed.
Dataports are relatively simple and quite flexible tools for importing and exporting data. The data format structure can be designed into the dataport as along with logic for accommodating editing, validating, combining, filtering, and so on of the data as it passes through the dataport. Dataports can be accessed directly from a menu entry, in the same fashion as forms and reports in the Classic Client.
At first glance, XMLports are for importing and exporting data, similar to the Dataports. But XMLports differ considerably in their operation, setup, and primary intended usage.
In the two-tier client, XMLport objects can only be used for XML-formatted data. They must be "fired off" by C/AL code resident in some other object type (in other words, a Classic Client XMLport cannot be run from the Object Designer and cannot be run directly through a menu entry).
In the three-tier client, XMLports now handle both XML structured data and other text data that was previously handled by Dataports. The description of a Dataport's functionality now applies to the three-tier client XMLport. The three-tier client XMLport can be run directly from a menu entry.
XML stands for eXtensible Markup Language. XML is a markup language much like HTML. XML was designed to describe data so that it would be easier to exchange data between dissimilar systems, for example, between your NAV ERP system and your accounting firm's financial analysis and tax preparation system.
XML is designed to be extensible, which means that you can create or extend the definition as long as you communicate the revised XML format to your correspondents. There is a standard set of syntax rules to which XML formats must conform. XML is becoming more and more important because most new software uses XML. For example, the new versions of Microsoft Office are quite XML "friendly". All web services communications are in the form of an exchange of XML structured data.
NAV's integration tools are designed to allow direct input and output between NAV databases and external, non-NAV routines. However, they do not allow access to C/AL-based logic. The internal business rules or data validation rules that would normally be enforced by C/AL code or trigger actions or various properties do not come into play when the data access is by means of one of the following integration tools. Therefore, you must be very careful in their use.
N/ODBC: NAV provides the standard ODBC interface between external applications (such as Word, Excel, Delphi, Access, and so on) and the Classic NAV database. This is a separately licensed granule. N/ODBC does not work with the SQL Server database.
C/OCX: This provides the ability to use OCXs to interface with the NAV database. This is also a separately licensed granule.
C/FRONT: This provides the ability to access the NAV database directly from code written in languages other than C/AL. Earlier, this type of interface was primarily coded in C, but beginning with V4.0 SP1, we now have the ability to interface from various .NET languages. In future versions, this capability is likely to expand. This too is a separately licensed granule.
Automation: This allows access to registered automation controller libraries within Windows from in-line C/AL code (for example, C/AL code can directly push data into a Word document template or an Excel spreadsheet template from C/AL). Automation controllers cannot be used to add graphical elements to NAV but they can contain graphical user interfaces that operate outside of NAV. When it is feasible to use an automation controller for interfacing externally, this is a simple and flexible way to expand the capabilities of your NAV system.
Web services: This functionality is described in brief earlier and in much more detail later. Web services are an industry standard API to NAV tables (through published pages) and functions (through published codeunits).
As with any system where you can do development work, careful attention to documentation and backing up your work is very important. C/SIDE provides a variety of techniques for handling each of these tasks.
When you are working within the Object Designer, you can back up individual objects of any type or groups of objects by exporting them. These exported object files can be imported in total, selectively in groups or individually, one object at a time. to recover the original version of one or more objects.
When objects are exported to text files, you can use a standard text editor to read or even change them. If, for example, you wanted to change all the instances of the field name Customer to Patient, you might export all the objects to text and execute a mass "Find and Replace". You won't be surprised to find out that making such code changes in a text copy of an object is subject to a high probability of error, as you won't have any of the many safety features of the C/SIDE editor keeping you from hurting yourself.
You can also use the NAV Backup function to create backup files containing just system objects or including data (a typical full system backup). A developer would typically use backup only as an easy way to get a complete snapshot of all the objects in a system. Backup files cannot be interrogated as to the detail of their contents, nor can selective restoration can be done. So, for incremental development backups, object exporting is the tool of choice. As NAV data is relational and highly integrated, it would generally not be good practice to attempt to backup and restore single data tables.
Internal documentation (that is, inside C/SIDE, not in external documents) of object changes can be done in three areas. First is the Object Version List, a field attached to every object, visible in the Object Designer screen. Whenever a change is made in an object, a notation should be added to the Version List. The second area for documentation is the Documentation section that appears in most object types. The third area you can place documentation is inline with modified C/AL code.
In every object type except MenuSuites, there is a Documentation section at the top of the object. The Documentation section is the recommended location for noting a relatively complete description of any changes that have been made to the object. Then, depending on the type of object and the nature of the specific changes, you should also consider annotating each change everywhere it affects the code, so the changes can be easily identified as such by the next developer looking at this object.
In short, everything applies that you have learned earlier about good backup practices and good documentation practices, when doing development in NAV C/SIDE. This holds true whether the development is new work or modification of existing logic.
In this chapter, we covered some basic definitions of terms related to NAV and C/SIDE. We reviewed the two-tier and the three-tier configuration options. Then we followed with the introduction of eight types of NAV objects (Tables, Pages/Forms, Reports, Codeunits, MenuSuites, Dataports, and XMLports). We also had an introduction to Page and Report Creation through review and hands-on use with the beginning of a NAV application for the ICAN not-for-profit organization. Finally, we looked briefly at the tools that we use to integrate with external entities and we discussed how different types of backups and documentation are handled in C/SIDE. Now that we have covered these basics in general terms, let's dive into the detail of the primary object types.
In the next chapter, we will focus on Tables, the foundation of an NAV system.
Microsoft Dynamics NAV 2009 is an ERP system. ERP stands for Extended Report Processor. True or False?
Which of the following are true about Dynamics NAV 2009? Choose three:
a. It has two clients, a Role Tailored Client and a Classic Client
b. It supports two databases, the Classic Database and Microsoft SQL Server
c. Role Tailored Client reporting primarily uses Excel for formatting
d. Support for Web Services is integrated as a standard feature
NAV 2009 is a full object-oriented system. True or False?
Which of the following choices are object types included in NAV 2009? Choose two:
a. Report, Dataport, Page, Codeunit
b. Report, XMLport, Form, SQL Server
c. PDF, XMLport, Report, Form
d. XMLport, Form, Table, MenuSuite
Development for NAV 2009 can all be done from within the C/SIDE environment. True or False?
All NAV objects except XMLports can contain C/AL code. True or False?
Licenses control not only what functions users have access to, but also what objects and object number ranges developers have access to. True or False?
The Classic Client is tied to the two tier system and the Role Tailored Client is tied to the three tier system. True or False?
NAV 2009 uses Journal tables for transaction data. Ledger tables are used at times for temporary work tables and at other times for permanent, Posted data storage. True or False?
Classic Clients run only Forms and the Role Tailored Clients run only Pages. True or False?
Which of the following have Wizards to help initiate the design of the object? Choose three:
a. MenuSuites
b. Reports
c. Pages
d. Forms
Keyboard shortcuts in the Role Tailored Client are a superset of those in the Classic Client. True or False?
A Visual Studio compatible report layout tool is an important part of the NAV 2009 development toolset. True or False?
Reports, Forms, Pages, Dataports and Codeunits can all be run directly from the Object Designer screen for testing. MenuSuites, Tables, and XMLports cannot be. True or False?