


 Download code from GitHub
Chapter 2: Plugin Framework Basics
From its very first beginnings, WordPress has always been designed as a very open platform. This openness has been exemplified not only through its open source licensing and distribution model but also its open plugin architecture, providing developers with the ability to deliver an even richer experience to its users.
While a basic WordPress installation provides a great amount of functionality that continues to expand from one release to the next, users often need to add one or more features to make it the perfect website management system to bring their project to life. This is where plugins come into play. They can fill this gap by augmenting or manipulating virtually any aspect of a WordPress website's display and administrative tasks.
Just like WordPress, plugins are written in the PHP programming language, which is structurally similar to more traditional languages such as C and C++. This code is stored in plain ASCII text files that are read and executed on a web server when pages are requested to be displayed. The secret ingredient that enables plugins to have such great power in WordPress is the inclusion of callback mechanisms, called hooks, throughout the platform's source code. These hooks come in two flavors, called action and filter hooks, which allow plugins to add content to a site and modify data before it is displayed, respectively. Whether it's rendering a site's front page, a single article, or its administration pages, WordPress has thousands of entry points where custom functions can be executed.
Beyond their ability to augment WordPress functionality, a side benefit of plugins is that most functionalities they add to a site are independent of the active theme. Therefore, users who like to change their theme frequently don't have to worry about manually adding back custom elements to their new themes when they make a switch.
This chapter explains the difference between action and filter hooks and shows how to use them to write a first set of plugins that will range in functionality, from adding information to a page header to defining new custom shortcodes.
In this chapter, we will cover the following topics:
- Creating a plugin file and header
- Adding output content to page headers using plugin actions
- Using WordPress path utility functions to load external files and images
- Modifying the site generator meta tag using plugin filters
- Adding text after each item's content using plugin filters
- Inserting link tracking code in the page body using plugin filters
- Troubleshooting coding errors and printing variable content
- Creating a new simple shortcode
- Creating a new shortcode with parameters
- Creating a new enclosing shortcode
- Loading a style sheet to format plugin output
- Writing plugins using object-oriented PHP
Technical requirements
You can find complete code examples on GitHub in the following repository: https://github.com/PacktPublishing/WordPress-Plugin-Development-Cookbook-Third-Edition.
Creating a plugin file and header
The first step of creating a plugin is to create a directory and a PHP file in the WordPress plugins directory and add the necessary information to have it recognized by the system. This first recipe shows you how to create a basic plugin file for WordPress and how to activate this new extension from the administration interface.
Getting ready
You should have access to a WordPress development environment, either on your local computer or a remote server, where you will be able to load your new plugin files (see Chapter 1, Preparing a Local Development Environment).
How to do it...
Follow these steps to create your first plugin header and activate the plugin in WordPress:
- Navigate to the WordPress
pluginsdirectory (wp-content/plugins) of your development installation. - Create a new subdirectory called
ch2-plugin-headerwithin the plugin directory. - Navigate to this directory and create a new text file called
ch2-plugin-header.php. - Open the new file in a code editor and add the following code:
<?php
/*
Plugin Name: Chapter 2 - Plugin Header
Plugin URI:
Description: Declares a plugin that will be visible in
the WordPress admin interface
Version: 1.0
Author: Yannick Lefebvre
Author URI: http://ylefebvre.ca
License: GPLv2
*/
Note
While the
Descriptiontext is shown on two separate lines in the code example, it should be entered as a single line in your code file to be completely displayed in the WordPress Plugins list. - Save and close the new file.
- Log in to the administration page of your development WordPress installation.
- Click on Plugins in the left-hand navigation menu to show a list of all installed plugins. You should see your new plugin listed next to the two default ones that come pre-packaged with WordPress:
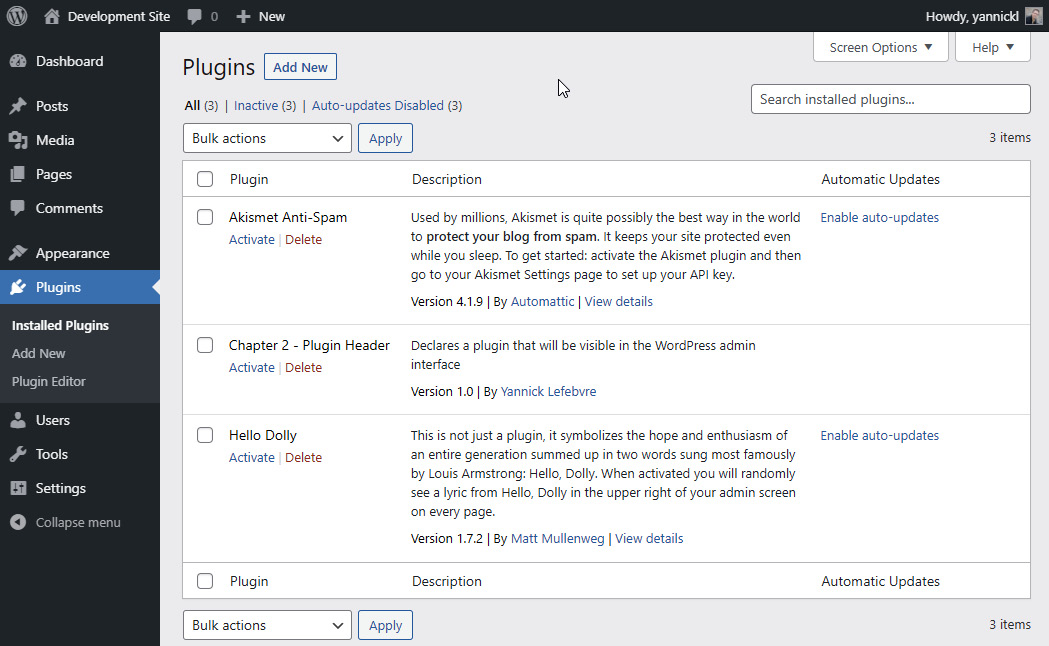
Figure 2.1 – The WordPress Plugins page showing the newly created plugin
Note
The list of default plugins may vary depending on how you built your development environment. You will see Akismet and Hello Dolly if you installed WordPress manually but might not see them if you are running a local development tool such as Local.
- Enable the plugin by clicking on the Activate link under its name. You will see that the background color of your new plugin changes to indicate that it has been activated, along with a message specifying that the activation was successful.
How it works...
Plugin files can either be located directly in the wp-content/plugins directory or in a subdirectory under this location, with most following this second approach. When you access the installed plugins list in the administration interface, WordPress scans the entire plugins directory, looking for PHP files that contain comments following the format specified in this recipe. In some cases, there can be more than one PHP file containing plugin header data in any of these directories, and each of them will show up as a separate entry in the Plugins list.
Taking a closer look at the code that we entered in the file, the first line of the plugin file (<?php) is a tag that identifies the beginning of the PHP code that will be analyzed and executed by the PHP interpreter. Optionally, we could include a closing PHP tag (?>) at the end of the file. However, most PHP developers omit the closing tag, since having any spaces after that tag will cause warnings to be displayed by the interpreter.
Tip
To ensure compatibility with most WordPress installations, it is important to use the complete <?php open tag syntax in your plugin code instead of the <? shorthand version. Not all PHP installations are configured to support the shorthand version, and many users don't have access to change this type of configuration on their server.
The second and last lines (/* and */) indicate that the text between these special delimiters should be considered as comments. Finally, each line within the comment contains a specific label, indicating the type of information that follows it. When this information is found, WordPress retrieves data about the plugin and adds it to the list.
When a plugin is activated, WordPress validates the file's content to be sure that it is valid PHP code. It will then execute this content every time any page is rendered on the site, whether that page is front-facing or a backend administration section. For this reason, it is preferable to activate plugins only when they are in use, to avoid site slowdowns.
Of course, at this point, our new plugin does not add or modify any functionality in our WordPress installation, since it does not contain any code, but this is still an important first step.
See also
- The Installing a local web server on your computer recipe in Chapter 1, Preparing a Local Development Environment
Adding output content to page headers using plugin actions
A common action performed by plugins is to add extra content to the header of visitor-facing pages generated by WordPress. This recipe shows you how to register an action hook function to add such additional content. To make this example more concrete, we will use the Google Analytics page header JavaScript code that so many people use to get good page view analytics for their site.
How to do it...
Follow these steps to learn how to register custom code to add content to a site's page headers:
- Navigate to the WordPress
pluginsdirectory of your development installation. - Create a new directory called
ch2-page-header-output. - Navigate to this directory and create a new text file called
ch2-page-header-output.php. - Open the new file in a code editor and add an appropriate header at the top of the plugin file, naming the plugin
Chapter 2 - Page Header Output. - Add the following line of code at the end of the file to register a function that will be called when WordPress renders the page header:
add_action( 'wp_head', 'ch2pho_page_header_output' );
- Add the following code section to provide an implementation for the
ch2pho_page_header_outputfunction:function ch2pho_page_header_output() { ?> <script> (function(i,s,o,g,r,a,m){i['GoogleAnalyticsObject']=r; i[r]=i[r]||function(){ (i[r].q=i[r].q||[]).push(arguments)}, i[r].l=1*new Date(); a=s.createElement(o), m=s.getElementsByTagName(o)[0];a.async=1;a.src=g; m.parentNode.insertBefore(a,m)}) (window,document,'script', 'https://www.google-analytics.com/analytics.js', 'ga'); ga('create', 'UA-0000000-0', 'auto'); ga('send', 'pageview'); </script> <?php } - Save and close the plugin file.
- Log in to the administration page of your development WordPress installation.
- Click on Plugins in the left-hand navigation menu.
- Activate your new plugin.
- Navigate to your website's front page and use your browser's View Page Source function to see the HTML source code for the site. Note that the exact name of this browser function will be slightly different based on which browser you are using. Search for
UA-0000000-0to see that all of the code contained between the two curled brackets of your new function is in your website's header:
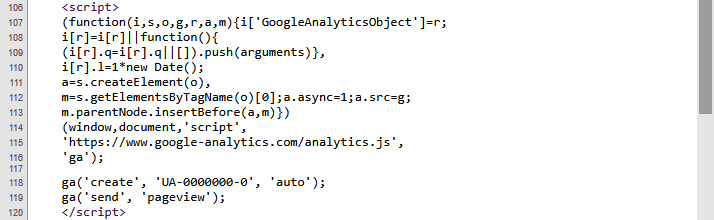
Figure 2.2 – Google Analytics code in the page source view
Note
If you are copying and pasting code from a digital version of this book, you will lose the original code indentation and should correct it in your code editor.
How it works...
The add_action function is used to associate custom plugin code to one of the two types of WordPress hooks, the action hook. As mentioned briefly in this chapter's introduction, hooks are the enabling functionality that make plugins possible in WordPress. Action hooks enable the execution of additional code at specific points when either public-facing or administration pages are prepared to be displayed. This code usually adds content to a site or changes the way a given action is performed.
In this recipe, the first line of code that we wrote registers a function named ch2pho_page_header_output with an action hook called wp_head. This action is one among more than 2,500 action hooks that are available in current versions of WordPress, and it allows any registered function to output additional content to the page header. Since all echoed content will be displayed, we can write our callback function very simply by placing ?> and <?php tags around the Google Analytics code. This will tell PHP to display all the content that is within that function's body, as opposed to interpreting it.
As you may have noticed, the current code is not very flexible, since you would need to hardcode your Google Analytics account number in the plugin code for it to function properly. The creation of a configuration panel and user settings in Chapter 3, User Settings and Administration Pages, will provide a way to configure such information to make our plugins more flexible.
Now, to fully understand its syntax, let's take a closer look at the complete add_action function:
add_action( 'hook_name', 'your_function_name', [priority],
            [accepted_args] );
The first parameter, the hook name, indicates the name of the WordPress hook with which we want our custom function to be associated. This name must be accurately spelled; otherwise, our function will not be called and no error message will be displayed.
The second parameter is the name of the plugin function that will be called to perform an action. This function can have any name, with the only condition being that this name must be unique to avoid conflicts with function names from other plugins or from the core WordPress code. In this recipe, the function name starts with an acronym representing the name of the plugin, making it much more unique.
The priority parameter is optional, as indicated by the square brackets, and has a default value of 10. It indicates the execution priority of this plugin relative to other plugin functions that hook into the same action, with a lower number indicating a higher priority. Any plugin can register one or more functions with an action hook using the add_action function. As it is rendering web pages, WordPress keeps a queue of all entries and calls them at the appropriate moment. It is interesting to note that the hook mechanism is also used by WordPress itself, as it regularly calls the add_action function in its own code to register functions to be called at the right time. If you realize that you need your function to be called before or after other plugins that are registering with the same hook, change the value of the priority parameter.
The last parameter of the add_action function, accepted_args, is also optional, has a default value of 1, and should be assigned a number when set. It should only be set to a different value for some particular hooks where more than one parameter will be passed to the registered function. Some of these hooks will be covered in later recipes.
There's more...
Finding the right hooks to register plugin functions is a large part of WordPress plugin development. Fortunately, there are a number of ways to get information on existing hooks and to learn when they get called during the WordPress page generation process.
Action hooks online listings
The WordPress Codex (https://codex.wordpress.org/) and WordPress Code Reference (https://developer.wordpress.org/reference/) are documentation sites that contain a multitude of information that is useful to users and developers alike. When it comes to action hooks, the Codex contains information on the most commonly used hooks, with basic descriptions indicating how they can be used; it can be found here: https://codex.wordpress.org/Plugin_API/Action_Reference. However, this is not a complete listing.
There are many third-party sites that parse the WordPress source code and provide their own hook listings (for example, http://hookr.io). While hooks are not as eloquently documented in these types of raw listings, they do provide basic information on their names and where they are called, as WordPress generates pages for visitors and administrators. These details can often be enough to find a hook based on the functionality that you are trying to implement.
Searching for hooks in the WordPress source code
Since WordPress is open source, another way to find information about hooks is to search directly within its code. For every action hook that accepts user functions, you will see a call to the do_action function to execute all the registered items. As you can see, the function takes two or more arguments, with the second one(s) being optional:
do_action( 'tag', [$arg] );
For the example shown in this recipe, a search for do_action( 'wp_head' ) reveals that it is the only function that is called when a WordPress theme makes a call to the wp_head() function in its header file:
do_action( 'wp_head' );
See also
- The Creating a plugin file and header recipe
Using WordPress path utility functions to load external files and images
On occasion, plugins need to refer to external files (for example, images, JavaScript, or jQuery script files) that are stored in the plugin directory. Since users are free to rename a plugin's folder or even install plugin files straight into the WordPress plugins directory, paths to any external files must be built dynamically based on the actual plugin location. Thankfully, a number of utility functions are present to simplify this task.
How to do it...
Follow these steps to create a simple plugin that will add a favicon meta tag to a website's header, pointing to an image file located in the plugin's directory:
- Navigate to the WordPress
pluginsdirectory of your development installation. - Create a new directory called
ch2-favicon. - Use a web service, such as https://favicongrabber.com/, to retrieve a website's favicon (for example, https://www.packtpub.com) and store it in the
ch2-favicondirectory with its default name (favicon.ico). - Navigate to the
ch2-favicondirectory and create a new text file calledch2-favicon.php. - Open the new file in a code editor and add an appropriate header at the top of the plugin file, naming the plugin
Chapter 2 - Favicon. - Add the following line of code to register a function that will be called when WordPress renders the page header:
add_action( 'wp_head', 'ch2fi_page_header_output' );
- Add the following code section to provide an implementation for the
ch2fi_page_header_outputfunction:function ch2fi_page_header_output() { $site_icon_url = get_site_icon_url(); if ( !empty( $site_icon_url ) ) { wp_site_icon(); } else { $icon = plugins_url( 'favicon.ico', __FILE__ ); ?> <link rel="shortcut icon" href="<?php echo esc_url( $icon ); ?>" /> <?php } } - Save and close the plugin file.
- Log in to the administration page of your development WordPress installation.
- Click on Plugins in the left-hand navigation menu.
- Activate your new plugin.
- Navigate to your website's front page and refresh it to see that the icon file that you assigned through your plugin code now appears in your browser's address bar, title bar, or navigation tab, depending on your preferred browser. The following screenshot shows how the favicon file is rendered in Microsoft Edge, Google Chrome, and Mozilla Firefox, from top to bottom:
Figure 2.3 – The website favicon appearing in Microsoft Edge, Google Chrome, and Mozilla Firefox
- Go to the Appearance section of your development site's Dashboard and Activate a theme other than Twenty Twenty-Two (for example, Twenty Twenty-One or Twenty Twenty). You may need to install one of these themes if they are not present in your development environment.
- Select the Customize submenu under the Appearance menu.
- Under Site Identity, assign a square image that is at least 512 x 512 pixels in dimension as the Site Icon; then, click the Publish button at the top of the customizer.
- Refresh your website to see that the newly assigned site icon image is now displayed instead of the
favicon.icofile. - Go back to the Appearance section and Activate the Twenty Twenty-Two theme.
How it works...
The plugins_url utility function, used in conjunction with the __FILE__ PHP constant and the name of our favicon file, allows us to quickly get the URL of this file located in our plugin directory. Once we have it, we can print out the appropriate HTML command to notify browsers of the location of this file.
The plugins_url function can be called with or without parameters. In the first case, it builds a URL by appending the path or filename found in the first parameter to the location of the file specified in the second argument. In the second situation, it simply returns the location of the plugin directory:
plugins_url( $path, $plugin );
Before we display our plugin's favicon file, we also call the get_site_icon_url function to see whether the user has already assigned a site icon using the WordPress customizer. If that is the case, we give priority to that icon and display it using the wp_site_icon() function.
Note
The Twenty Twenty-Two theme found in WordPress 5.9 is built using a new theme creation technique and does not have a customizer section. This is why we change our site theme to demonstrate how our code takes into consideration site icons assigned in the customizer. The majority of themes available today have customizer sections, but this may change as WordPress evolves. The Twenty Twenty-Two theme may also add a customizer section in future releases.
There's more...
The plugins_url function is one of the many functions that can be used in plugins to help find the location of files in a WordPress installation. Other useful functions include the following:
get_theme_root(): Returns the address of the theme installation directoryget_template_directory_uri(): Retrieves the URL to the current theme's filesadmin_url(): Provides the address of the WordPress administrative pagescontent_url(): Indicates where thewp-contentdirectory can be foundsite_url()andhome_url(): Returns the site addressincludes_url(): Provides the location of WordPress include fileswp_upload_dir(): Indicates the directory where user-uploaded files are stored
See also
- The Creating a plugin file and header recipe
- The Adding output content to page headers using plugin actions recipe
Modifying the site generator meta tag using plugin filters
Beyond adding functionality or content to a site, the other major task commonly performed by plugins is to augment, modify, or reduce information before it is displayed on the screen. This is done by using WordPress filter hooks, which allow plugins to register a custom function through the WordPress API to be executed when content is prepared before it is sent to the browser.
How to do it...
Follow these steps to implement your first filter callback function that modifies the contents of the generator meta tag found in a site's HTML source code:
- Navigate to the WordPress
pluginsdirectory of your development installation. - Create a new directory called
ch2-generator-filter. - Navigate to this directory and create a new text file called
ch2-generator-filter.php. - Open the new file in a code editor and add an appropriate header at the top of the plugin file, naming the plugin
Chapter 2 - Generator Filter. - Add the following line of code to register a function that will be called when WordPress is preparing data to output the generator meta tag as part of the page header:
add_filter( 'the_generator', 'ch2gf_generator_filter',
            10, 2 );
- Add the following code section at the end of the file to provide an implementation for the
ch2gf_generator_filterfunction:function ch2gf_generator_filter ( $html, $type ) { if ( $type == 'xhtml' ) { $html = preg_replace( '("WordPress.*?")', '"Yannick Lefebvre"', $html ); } return $html; } - Save and close the plugin file.
- Log in to the administration page of your development WordPress installation.
- Click on Plugins in the left-hand navigation menu.
- Activate your new plugin.
- Use a web browser to visit your website and display the page source. Searching for the
generatorkeyword will reveal that the content generator meta tag has been modified and now reads as follows:<meta name="generator" content="Yannick Lefebvre" />
How it works...
The add_filter function is used to associate a custom plugin function to the second type of WordPress hook, the filter hook. Filter hooks give plugins the chance to augment, modify, delete, or completely replace information while WordPress is executed. To enable this, filter functions are sent data that can be modified as a function parameter. They must return the resulting set of data to WordPress once they have finished making the changes.
Unlike action hooks, filter functions must not output any text or HTML code, since they are executed while output is being prepared, and that would likely result in output showing up in unexpected places in the site layout. Instead, they should return the filtered data.
Taking a closer look at the parameters of the add_filter function, we can see that it is very similar to the add_action function that we saw in the last few recipes:
add_filter( 'hook_name', 'your_function_name', [priority],
            [accepted_args] );
The first parameter, the hook name, indicates the name of the WordPress hook that we want our custom function to be associated with. This name must be accurately spelled; otherwise, our function will not be called, and no error message will be displayed.
The second parameter is the name of the plugin function that will be called to filter data. This function can have any name, with the only condition being that this name must be unique to avoid conflicting with functions from other plugins or from the WordPress code.
The priority parameter is optional, as indicated by the square brackets, and has a default value of 10. It indicates the execution priority of this callback relative to other callbacks that are registered by WordPress itself and by other plugins, with a lower number indicating a higher priority.
The last parameter of the function, accepted_args, has a default value of 1 and indicates how many parameters will be sent to your custom filter function. It should only be set to higher values when you are using filters that will send multiple parameters, as shown in this recipe with the $html and $type arguments.
There's more...
Beyond demonstrating how to change the site generator name, this plugin also showed how to use an advanced PHP function to perform the actual text replacement. We will take a closer look at this function and also explore resources to learn more about filter hooks.
The preg_replace function
The preg_replace function is a PHP function that can be used to perform a search and replace operation within a string based on a search pattern. We use this function rather than the simpler str_replace function, since we want to find and replace both the WordPress keyword and its associated version number, which changes with every version.
Filter hooks online listings and the apply_filters function
Similar to action hooks, information about commonly used filter hooks can be found at the WordPress Codex (https://codex.wordpress.org/Plugin_API/Filter_Reference) or on sites that provide raw function lists (for example, http://hookr.io).
It is also possible to learn about filter hooks by searching for occurrences of the apply_filters function in the WordPress code. As can be seen in the following code, this function has a variable number of arguments, with the first one being the name of the filter hook, the second representing the value that the registered function will be able to modify, and the remaining optional parameters containing additional data that may be useful in the implementation of the filter function:
apply_filters( $tag, $value, [$var] ... );
For the example shown in this recipe, a search for apply_filters( 'the_generator' in the WordPress code reveals that it is called within the the_generator template function:
echo apply_filters( 'the_generator',
                    get_the_generator( $type ), $type );
See also
- The Creating a plugin file and header recipe
Adding text after each item's content using plugin filters
After making a number of changes to the page header, the generator meta tag, and the site favicon, this recipe takes a more active role by adding a link to each post or page, allowing visitors to email a link to the article that they are currently viewing. This functionality is implemented using a filter hook attached to the page and post content. This allows our custom function to append custom output code to all entries that get displayed on the screen.
How to do it...
Follow these steps to create a plugin that adds an email link at the end of all posts and pages:
- Navigate to the WordPress
pluginsdirectory of your development installation. - Create a new directory called
ch2-email-page-link. - Navigate to this directory and create a new text file called
ch2-email-page-link.php. - Open the new file in a code editor and add an appropriate header at the top of the plugin file, naming the plugin
Chapter 2 - Email Page Link. - Visit an icon download website, such as https://iconarchive.com, and download an email icon with a small resolution (32 x 32 pixels) in PNG format to the
ch2-email-page-linkdirectory, giving it the namemailicon.png. - Add the following line of code at the end of the file to register a function that will be called when WordPress is preparing data to display the content of a post or page:
add_filter( 'the_content',
            'ch2epl_email_page_filter' );
- Add the following code section to provide an implementation for the
ch2epl_email_page_filterfunction:function ch2epl_email_page_filter ( $the_content ) { // build url to mail message icon $mail_icon_url = plugins_url( 'mailicon.png', __FILE__ ); // Set value of $new_content to previous content $new_content = $the_content; // Append image with mailto link after content, // including the item title and permanent URL $new_content .= '<div class="email_link">'; $new_content .= '<a title="Email article link"'; $new_content .= 'href="mailto:someone@somewhere.com?'; $new_content .= 'subject=Check out this interesting '; $new_content .= 'article entitled '; $new_content .= get_the_title(); $new_content .= '&body=Hi!%0A%0AYou might '; $new_content .= 'enjoy this article entitled '; $new_content .= get_the_title() . '.%0A%0A'; $new_content .= get_permalink(); $new_content .= '%0A%0AEnjoy!">'; $new_content .= '<img alt="Email icon" src="'; $new_content .= esc_url( $mail_icon_url ); $new_content .= '" /></a></div>'; // Return filtered content for display on the site return $new_content; } - Save and close the plugin file.
- Log in to the administration page of your development WordPress installation.
- Click on Plugins in the left-hand navigation menu.
- Activate your new plugin.
- Visit your website to see the new mail icon at the end of each post and page. You may need to click on an article or page to see the icon:

Figure 2.4 – The newly added Email article link icon
- Click on one of the mail links:

Figure 2.5 – The email generated after clicking on the link
As seen in Figure 2.5, your default mail client will come up with information about the item you were reading. The only information that needs to be updated is the recipient address before visitors can quickly send an email.
How it works...
Similar to the previous recipe, this plugin uses the add_filter function to register a custom function to be called by WordPress as it prepares an item's content to be displayed on a page. When the filter function is called, the first action that it performs is to create a URL to the email icon that was downloaded in the recipe. It then goes on to modify the original content by appending the HTML code to display a mailto link. The same technique can be used to create links to popular social media and link sharing sites, with simple changes to the syntax of the link. Once the new content is ready, it is returned to WordPress to be sent to any other registered filters and subsequently displayed on the site.
There's more...
This recipe also introduces a pair of useful WordPress utility functions to get access to the current item's content.
The get_the_title and get_permalink functions
While these two functions are mainly seen within theme template files, they can also be used by plugins to get easy access to the content of items that are currently being processed. More specifically, the two utility functions that are used in this recipe are as follows:
get_the_title(): This function gives us quick access to the item's title.get_permalink(): This is a function that returns the item's permalink (a URL that is always associated with this post or page, even after it is no longer featured on a website's front page or blog page).
See also
- The Creating a plugin file and header recipe
- The Using WordPress path utility functions to load external files and images recipe
- The Modifying the site generator meta tag using plugin filters recipe
Inserting link tracking code in the page body using plugin filters
After seeing how to append text to existing content, this recipe shows you how to modify page content before it is displayed onscreen. More specifically, the following plugin expands on the Google Analytics header plugin created earlier and adds a JavaScript function to all links that are included in posts and pages to track when they are clicked by visitors.
Getting ready
You should have already followed the Adding output content to page headers using plugin actions recipe to have a starting point for this recipe, and the resulting plugin should be active in your development site. Alternatively, you can download the resulting code (ch2/ch2-page-header-output/ch2-page-header-output.php) for the book's GitHub page.
How to do it...
Follow these steps to add outbound link tracking code to your simple Google Analytics plugin:
- Navigate to the
ch2-page-header-outputfolder in the WordPresspluginsdirectory of your development installation. - Open the
ch2-page-header-output.phpfile in a code editor. - Add the following line after the existing code to register a function that will be called when WordPress is preparing data to display a page or post's content:
add_filter( 'the_content',
            'ch2lfa_link_filter_analytics' );
- Add the following code section to provide an implementation for the
ch2lfa_link_filter_analyticsfunction:function ch2lfa_link_filter_analytics ($the_content) { $new_content = str_replace( 'href', 'onClick="recordOutboundLink( this );return false;" href', $the_content ); return $new_content; } - Add the following line of code to register a function that will be called when WordPress renders the page footer:
add_action( 'wp_footer',
            'ch2lfa_footer_analytics_code' );
- Add the following code section to provide an implementation for the
ch2lfa_footer_analytics_codefunction:function ch2lfa_footer_analytics_code() { ?> <script type="text/javascript"> function recordOutboundLink( link ) { ga( 'send', 'event', 'Outbound Links', 'Click', link.href, { 'transport': 'beacon', 'hitCallback': function() { document.location = link.href; } } ); } </script> <?php } - Save and close the plugin file.
- Go to the Posts section of the Dashboard and edit one of the items to add a link within the content, pointing to a location of your choice.
- Click Update to save the changes to the modified post.
- In your web browser, refresh your website to see the modified post.
- Right-click on the new link and Inspect it using your browser's developer tools:

Figure 2.6 – Custom JavaScript code added to web links in the page output
As seen in Figure 2.6, the link tag now has an additional onClick JavaScript property with code that will be called when visitors follow it, along with the definition of the recordOutboundLink function in the page footer.
How it works...
The content filter function that is put in place by calling add_filter receives the entire content of all the posts and pages before they are rendered to the browser and is allowed to make any number of changes to this information. In this case, we are using the PHP str_replace function to search for any occurrence of the href string, which indicates a link. When the string is found, it is replaced with a call to a JavaScript function while preserving the original href tag.
To make this plugin complete, it also needs to provide an implementation for the JavaScript recordOutboundLink function. This is done by registering a custom function with the wp_footer action hook, which will output extra content once in the website's footer.
The resulting plugin automates many of the tasks related to tracking usage data on a website using Google Analytics.
See also
- The Adding output content to page headers using plugin actions recipe
- The Adding text after each item's content using plugin filters recipe
Troubleshooting coding errors and printing variable content
As you transcribe code segments from the pages of this book or start writing your own plugins, there is a strong chance that you will have to troubleshoot problems with your code. You might also run into trouble working with data that your plugin is meant to manipulate. This recipe shows basic techniques to identify and quickly resolve these errors while creating a plugin that will hide an item from the navigation menu for users who are not logged in to your site.
How to do it...
Follow these steps to learn how to troubleshoot problematic plugin code:
- Navigate to the WordPress
pluginsdirectory of your development installation. - Create a new directory called
ch2-nav-menu-filter. - Navigate to this directory and create a new text file called
ch2-nav-menu-filter.php. - Open the new file in a code editor and add an appropriate header at the top of the plugin file, naming the plugin
Chapter 2 - Nav Menu Filter. - Add the following line of code to register a function that will be called when WordPress is preparing data to display the site's navigation menu:
add_filter( 'wp_nav_menu_objects',
            'ch2nmf_new_nav_menu_items', 10, 2 );
- Add the following code section to provide an implementation for the
ch2nmf_new_nav_menu_itemsfunction. Note that the wordfunctiois mistyped on purpose at the beginning of the first line:functio ch2nmf_new_nav_menu_items ( $sorted_menu_items, $args ) { print_r( $sorted_menu_items ); return $sorted_menu_items; }Tip
If you are using a dedicated code editor, you should be able to tell that the
functiotext is not a recognized keyword, since it will not be colored as a PHP keyword and might also be underlined to indicate an error. - Save the plugin file and leave your code editor open.
- Log in to the administration page of your development WordPress installation.
- Click on Plugins in the left-hand navigation menu.
- Activate your new plugin.
- WordPress will display a fatal error message, indicating that the plugin could not be activated, since a parsing error was found. It also indicates the exact filename and line where the error occurred, helping to narrow down where the problem occurred. The actual format of the error message may be different based on the local development tool that you're using:
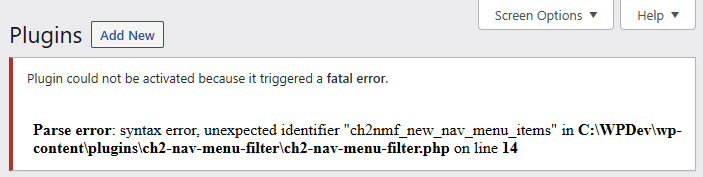
Figure 2.7 – A fatal error upon plugin activation due to a syntax error
- Go back to your code editor, correct the spelling of the word
function, and save the file. - Activate the plugin a second time. It should now activate correctly.
- Back in the code editor, remove the last letter of the word
functionto re-introduce a syntax error, and save the file. - Visit the development site in your browser. You will now see that the entire site has been replaced with a Parse error message similar to the one we just saw. You may also only get a blank page or a critical error, depending on your web server configuration.
- Go to the Appearance section of your development site's Dashboard and Activate a theme other than Twenty Twenty-Two (for example, Twenty Twenty-One or Twenty Twenty). You may need to install one of these themes if they are not present in your development environment.
- In the WordPress Dashboard, navigate to the Appearance | Menus item.
- If you don't have any menu defined, type
Main Menuin the Menu Name field. Check the appropriate Display location checkboxes to assign your new menu to the theme's main navigation area. The exact name of this location will change based on the theme you're using. Click on Create menu to save your menu. - Create an additional item in your menu as a Custom Link, setting the URL to
/privateareaand the Link Text toPrivate Area; then, click on Add to Menu:
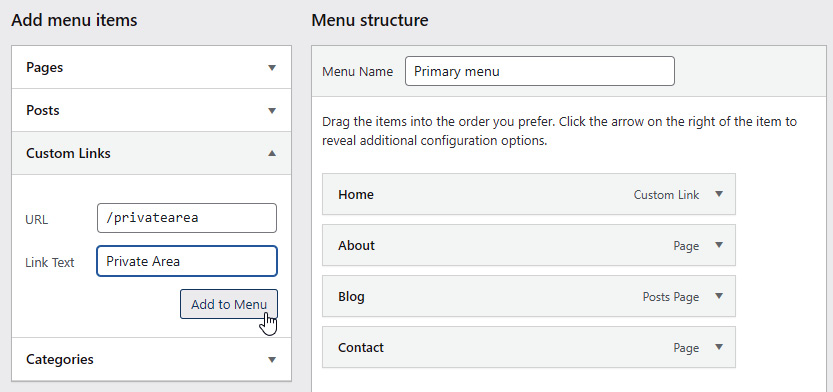
Figure 2.8 – Creating a new menu item
- Click on the Save Menu button to save your changes.
- Back in your code editor, correct the spelling error once again and refresh the page to see the website return to normal. You will also see that a lot of information is now being printed before the navigation menu. This output is generated by the
print_rfunction and is meant to help us understand how the data received by our filter function is organized. Once we have a good understanding of that data, we will be able to properly make changes to this information in the next step. To view theprint_rdata in a more organized way, bring up the View Page Source function of your browser and search for the keywordArrayto quickly find the menu data. - Back in the code editor, replace the line containing the
print_rfunction call with the following code:// Check if used is logged in, continue if not logged if ( is_user_logged_in() == FALSE ) { // Loop through all menu items received // Place each item's key in $key variable foreach ( $sorted_menu_items as $key => $sorted_menu_item ) { // Check if menu item matches search string if ( 'Private Area' == $sorted_menu_item->title ) { // Remove item from menu array if found // using item key unset( $sorted_menu_items[ $key ] ); } } } - Refresh your website, and you will see that the large array printout has disappeared. If you are logged in as the administrator, you will also notice the Private Area link in your menu. Log out of your site or open an incognito session in your browser to see the page without the new menu item.
- Go back to the Appearance section and Activate the Twenty Twenty-Two theme.
How it works...
As WordPress assembles a list of all available plugins to display them in the administration interface, it does not check to see whether each plugin's PHP code is valid. This check is only done when a plugin is activated. At that time, any syntax error will be caught immediately and the newly activated plugin will remain inactive, preventing a failure of the entire website.
That being said, once a plugin is activated, its code is evaluated every time WordPress renders a web page, and any subsequent code error that gets saved to the plugin file will cause the site to stop working correctly. For this reason, it is highly recommended to set up a local development environment, as discussed in Chapter 1, Preparing a Local Development Environment, to avoid affecting a live site when an inevitable error creeps up in your plugin code. To avoid potential outages on a live website, it is safer to deactivate plugins before making changes to them and then reactivate them once changes are completed. This way, all changes are validated before the plugin code is reactivated. It should be noted that, with this method, the plugin's functionality won't be available on your site while you make changes, so it is not an optimal way to modify deployed code.
Once the code is working correctly, the second part of this recipe shows us how to visualize the information received by a registered filter function. While the WordPress Codex website provides great documentation of the purpose of most available filters, it does not go into detail about the structure of the information that is sent to each filter function.
Thankfully, the PHP print_r function comes in very handy, since it can display the content of any variable on the screen, no matter what information is stored in the variable that it receives as an argument.
Last, but not least, the implementation of the custom filter function uses the WordPress API is_user_logged_in() function to see whether the person viewing the site has provided login credentials. If the return value of the function is true, our code goes on to parse all the menu items and remove the Private Area menu item.
Note
This is the second time in this chapter that we ask you to activate a theme other than the default WordPress 5.9 Twenty Twenty-Two theme. With WordPress 5.9, WordPress is introducing a new theme-building paradigm where users will be able to modify their site layout using a graphical tool. Some action and filter hooks don't work with this new theme structure in this first version. That being said, all code samples in this book work with the large majority of themes that are available today and are running on most WordPress sites.
There's more...
In addition to the debugging techniques used in this recipe, WordPress offers a number of built-in tools to facilitate plugin troubleshooting.
Built-in WordPress debugging features
While the wp-config.php file, located at the top of the WordPress file structure, is primarily used to store basic site configuration data, it can also be used to trigger a number of debugging features. The first of these is debug mode, which will display all PHP errors, warnings, and notices at the top of site pages. For example, having this option active will show any undefined variables that you try to access in your code along with any deprecated WordPress function. To activate this tool, change the second parameter of the line defining the WP_DEBUG constant from false to true in wp_config.php:
define( 'WP_DEBUG', true );
If the WP_DEBUG line does not appear in your development site's wp-config.php file, you can add it before the line that reads the following:
/* That's all, stop editing! Happy publishing. */
To prevent debug messages from affecting the site's layout, you can download a useful plugin called Debug Bar (https://wordpress.org/plugins/debug-bar/) to collect messages and display them in the admin bar, as shown here:
Figure 2.9 – The Debug Bar plugin
Other debugging features that can be activated from the wp-config.php file are as follows:
WP_DEBUG_LOG: Stores all debug messages in a file nameddebug.login the site'swp-contentdirectory for later analysisWP_DEBUG_DISPLAY: Indicates whether error messages should be displayed on the siteSAVEQUERIES: Stores database queries in a variable that can be displayed in the page footer (see https://wordpress.org/support/article/editing-wp-config-php/#save-queries-for-analysis for more information)
Better debugging with Xdebug
While all of the debugging techniques mentioned in this chapter are valid, they do require manual intervention to insert and remove code, especially in the case of the print_r function called to view data received by the filter function. If you forget to remove a manual debugging statement, your users will end up with debug data on their site if you distribute your work.
As you become more invested in plugin development, you should consider setting up a development server that supports Xdebug. One of the benefits of this debugging tool is that coding errors will be displayed with more details about where they were found and the code that was executed leading up to the error. More importantly, Xdebug allows developers to connect a code editor such as Visual Studio Code to the web server to be able to step through each individual line of code as they are executed. It is also possible to set breakpoints to stop execution in specific places and see data in all variables every step of the way.
See also
- The Modifying the site generator meta tag using plugin filters recipe
Creating a new simple shortcode
Shortcodes are a very popular tool in WordPress that allow users to easily add content generated by plugins or themes to any page or post without needing to be familiar with PHP code and editing theme template files. As they are very simple to create, shortcodes can also be used to easily automate the display of content that repeatedly needs to be inserted on your site.
How to do it...
Follow these steps to create a new custom shortcode that will accelerate the task of linking to a specific Twitter page in any post or page:
- Navigate to the WordPress
pluginsdirectory of your development installation. - Create a new directory called
ch2-twitter-shortcode. - Navigate to this directory and create a new text file called
ch2-twitter-shortcode.php. - Open the new file in a code editor and add an appropriate header at the top of the plugin file, naming the plugin
Chapter 2 - Twitter Shortcode. - Add the following line of code to declare a new shortcode, simply using the two
tlcharacters, and specify the name of the function that should be called when the code is encountered in posts or pages:add_shortcode( 'tl', 'ch2ts_twitter_link_shortcode' );
- Add the following code section to provide an implementation for the
ch2ts_twitter_link_shortcodefunction:function ch2ts_twitter_link_shortcode( $atts ) { $output = '<a href="https://twitter.com/ylefebvre">'; $output .= 'Twitter Feed</a>'; return $output; } - Save and close the plugin file.
- Log in to the administration page of your development WordPress installation.
- Click on Plugins in the left-hand navigation menu.
- Activate your new plugin.
- Edit an existing post on your site and use the
[tl]shortcode in the code editor:
![Figure 2.10 – Inserting the [tl] shortcode in the new page contents](https://static.packt-cdn.com/products/9781801810777/graphics/image/Figure_2.10_B17639.jpg)
Figure 2.10 – Inserting the [tl] shortcode in the new page contents
- Save and view the post to see that the shortcode was replaced by a link to a Twitter page attached to the words
Twitter Feed.
How it works...
Shortcodes have similarities with both action hooks and filter hooks, since their associated custom function is called when it is time to perform a task, just like an action hook, but they must return their output through a return value, just like a filter hook. In terms of external data, the function associated with a shortcode will receive data in the case of some types of shortcodes, while it will only produce output in other cases.
When used in the content of a post or page, any shortcode surrounded by a pair of square brackets is identified by the WordPress engine, which then searches for functions registered for that specific code. If found, the associated function is called, and the expected result is used to replace the original shortcode text in the item's content. Just like filter functions, shortcode functions must not output any text directly, since it will likely appear in an unexpected place in the page layout, as WordPress calls all shortcode-processing functions before displaying the body of an item.
For simple shortcodes, such as the one found in this recipe, the plugin functions associated with them must return information, but they do not receive any additional data through function parameters. That being said, they can rely on utility functions, such as get_the_ID, get_the_title, and other WordPress utility functions, to get more information on the item that contains them and be able to produce tailored output. Other types of shortcodes seen in later recipes will have more context and configuration options. It is also possible for shortcodes to access stored options data, which will be covered in Chapter 3, User Settings and Administration Pages.
See also
- The Creating a plugin file and header recipe
Creating a new shortcode with parameters
Simple shortcodes already provide a lot of potential to output complex content to a page by entering a few characters in the post or page editors. That being said, they become even more useful when they are coupled with parameters that will be passed to their associated processing function. Using this technique, it becomes very easy to create a shortcode that accelerates the insertion of external content in WordPress posts or pages by only needing to specify the shortcode and the unique identifier of the source element to be displayed.
How to do it...
Follow these steps to create a shortcode that will be used to quickly add Twitter feeds to posts or pages:
- Navigate to the WordPress
pluginsdirectory of your development installation. - Create a new directory called
ch2-twitter-embed. - Navigate to this directory and create a new text file called
ch2-twitter-embed.php. - Open the new file in a code editor and add an appropriate header at the top of the plugin file, naming the plugin
Chapter 2 - Twitter Embed. - Add the following line of code to declare a new shortcode and specify the name of the function that should be called when the shortcode is found in posts or pages:
add_shortcode( 'twitterfeed',
               'ch2te_twitter_embed_shortcode' );
- Add the following code section to provide an implementation for the
ch2te_twitter_embed_shortcodefunction:function ch2te_twitter_embed_shortcode( $atts ) { extract( shortcode_atts( array( 'user_name' => 'ylefebvre' ), $atts ) ); if ( empty( $user_name ) ) { $user_name = 'ylefebvre'; } else { $user_name = sanitize_text_field( $user_name ); } $output = '<p><a class="twitter-timeline" href="'; $output .= esc_url( 'https://twitter.com/'.$user_name ); $output .= '">Tweets by ' . esc_html( $user_name ); $output .= '</a></p><script async '; $output .= 'src="//platform.twitter.com/widgets.js"'; $output .= 'charset="utf-8"></script>'; return $output; } - Save and close the plugin file.
- Log in to the administration page of your development WordPress installation.
- Click on Plugins in the left-hand navigation menu.
- Activate your new plugin.
- Create a new page and use the
[twitterfeed user_name='WordPress']shortcode in the page editor, whereWordPressis the Twitter username of the feed to display:
Figure 2.11 – Inserting the Twitter feed shortcode with its user_name parameter
- Publish and view the page to see that the shortcode has been replaced by an embedded Twitter feed on your site. The Twitter feed may be quite large, based on the theme you are using on your development site.
- Edit the page and remove the
user_nameparameter and its associated value, only leaving the core[twitterfeed]shortcode in the post; then Update to save changes. - Refresh the page to see that the feed is still being displayed but now shows tweets from a default account specified by the code.
How it works...
When shortcodes are used with parameters, these extra pieces of data are sent to the associated processing function in the $atts parameter variable. By using a combination of the standard PHP extract and WordPress-specific shortcode_atts functions, our plugin is able to parse the data it receives and create an array of identifiers and values that are subsequently transformed into PHP variables. These variables are used in the rest of our shortcode implementation function. In this specific example, we expect a single variable to be used, called user_name, which will be stored in a PHP variable called $user_name. If the user enters the shortcode without any parameter, a default value of ylefebvre will be assigned to the $user_name variable to ensure that the plugin still works. Since we are going to accept user input in this code, we also verify that the user did not provide an empty string. We also use the sanitize_text_field function to make sure that there is no hazardous code in what the user entered, along with the esc_html and esc_url functions to be absolutely sure to remove any potentially harmful HTML characters before we output the destination link and its accompanying text to the browser.
Once we have access to the Twitter username, we can put together the required HTML code that will embed a Twitter feed in our page and display the selected user's tweets.
While this example only has one argument, it is possible to define multiple parameters for a shortcode. In such a situation, parameters can be provided in any order by the user.
See also
- The Creating a new simple shortcode recipe
Creating a new enclosing shortcode
A different type of shortcode that exists in WordPress is one that encloses content in posts and pages. Using a syntax similar to HTML tags, enclosing shortcodes can be used to identify parts of an item's content that need to be treated in a special way. For example, it is possible to use this type of shortcode to style a part of the post.
As an example of how to create enclosing shortcodes, this recipe shows you how to create a set of tags that will identify part of a post or page that should only be shown to visitors that are logged in to a site. In this way, the shortcode acts similarly to a filter hook, with the added bonus that you do not need to parse for instances of these tags in your code, as would normally be done in a filter callback.
How to do it...
Follow these steps to create a new enclosing shortcode to identify private parts of website content:
- Navigate to the WordPress
pluginsdirectory of your development installation. - Create a new directory called
ch2-private-item-text. - Navigate to this directory and create a new text file called
ch2-private-item-text.php. - Open the new file in a code editor and add an appropriate header at the top of the plugin file, naming the plugin
Chapter 2 - Private Item Text. - Add the following line of code to declare a new shortcode and specify the name of the function that should be called when the shortcode is found in posts or pages:
add_shortcode( 'private',
               'ch2pit_private_shortcode' );
- Add the following code section to provide an implementation for the
ch2pit_private_shortcodefunction:function ch2pit_private_shortcode( $atts, $content = null ) { if ( is_user_logged_in() ) { return '<div class="private">' . $content . '</div>'; } else { $output = '<div class="register">'; $output .= 'You need to become a member to '; $output .= 'access this content.</div>'; return $output; } } - Save and close the plugin file.
- Log in to the administration page of your development WordPress installation.
- Click on Plugins in the left-hand navigation menu.
- Activate your new plugin.
- Create a new post and wrap some of the content with the
[private]and[/private]tags:

Figure 2.12 – Using the private enclosing shortcode
- Save and view the post to see that the text is visible while you are logged in to your site.
- Open an incognito browser view and visit the page to see that the enclosed text has been replaced by a general message.
How it works...
Similar to a filter function, enclosing shortcodes receive a copy of the text that has been wrapped with new tags through the $content parameter. It is then possible to return this text with additional HTML code, or completely replace it with new content. In this specific case, we used the is_user_logged_in WordPress function to determine whether the current visitor is logged in to the site. Based on the result of that query, the code determines whether the original content should be displayed with some additional div tags, or whether the visitor should see a message encouraging them to join the website to see this content.
See also
- The Creating a new simple shortcode recipe
Loading a style sheet to format plugin output
When a plugin adds custom content or inserts styling tags to a post or page's existing content, as was done in the previous recipe that showed how to create an enclosing shortcode, it often needs to load a custom style sheet to style these new elements. This recipe shows how to add a style sheet in the WordPress style queue to format the private output created in the previous recipe. This queue is processed when the page header is rendered, listing all the style sheets that need to be loaded to display the site correctly.
Getting ready
You should have already followed the Creating a new enclosing shortcode recipe to have a starting point for this recipe, and the resulting plugin should still be active in your development site. Alternatively, you can download the resulting code (ch2/ch2-private-item-text/ch2-private-item-text.php) of that recipe from the book's GitHub page.
How to do it...
Follow these steps to add insert custom Cascading Style Sheet (CSS) code in your page output:
- Navigate to the
ch2-private-item-textfolder of the WordPresspluginsdirectory of your development installation. - Open the
ch2-private-item-text.phpfile in a code editor. - Add the following line after the existing code to register a function that will be called at the beginning of the WordPress page display process:
add_action( 'wp_enqueue_scripts',
            'ch2pit_queue_stylesheet' );
- Add the following code section to provide an implementation for the
ch2pit_queue_stylesheetfunction:function ch2pit_queue_stylesheet() { wp_enqueue_style( 'privateshortcodestyle', plugins_url( 'stylesheet.css', __FILE__ ) ); } - Save and close the plugin file.
- Create a new text file in the
ch2-private-item-textdirectory calledstylesheet.cssand open it in a code editor. - Add the following content to the file:
.private { color: #6E6A6B; } .register { background-color: #ff4d4d; color: #fff; padding-left: 10px; } - Save and close the text file.
- Navigate to your website, making sure you are logged in, and refresh the page containing the private text content. You should notice that the private text is now displayed in gray.
- Open the site in an incognito browser view to see that the registration message styling has changed to be displayed in white with a red background.
How it works...
While it would have been possible to write straight HTML code to load the CSS file by registering a function with the wp_head action hook, as we have done previously, WordPress has utility functions designed to help avoid loading duplicate style sheets or scripts on a site. In this specific example, wp_enqueue_script is used to place the plugin's style sheet file in a queue that will be processed when the plugin header is rendered, with the associated name privateshortcodestyle. Once WordPress has processed all the plugins and boiled down all the style sheet requests to single instances, it will output the necessary HTML code to load all of them.
The content of the stylesheet.css file is standard CSS code that specifies that any text that is assigned the private class should be displayed in gray, while the text displayed to non-registered users should be displayed in white on a red background.
See also
- The Creating a new enclosing shortcode recipe
Writing plugins using object-oriented PHP
So far, all the plugin examples that have been covered in this chapter have been written using the procedural PHP programming style. In this style, all functions are declared directly in the main body of the plugin and the hook registration functions have direct access to these functions.
WordPress plugins can also be written using an object-oriented PHP approach. This recipe shows how the code from the previous recipe can be restructured to be written in object-oriented PHP.
Getting ready
You should have already followed the Loading a style sheet to format plugin output recipe to have a starting point for this recipe. Alternatively, you can download the resulting code (ch2/ch2-private-item-text/ch2-private-item-text-v2.php) for that recipe from the book's GitHub page.
How to do it...
Follow these steps to transform an existing plugin's code into object-oriented PHP:
- Log in to the administration page of your WordPress installation.
- Click on Plugins in the left-hand navigation menu.
- Check whether the Chapter 2 - Private Item Text plugin is currently active and Deactivate it if it is.
- Copy the entire contents of the
ch2-private-item-textdirectory and rename the copych2-oo-private-item-text. - Navigate to the newly renamed folder and rename the main PHP code file
ch2-oo-private-item-text.php. - Open the newly renamed plugin file in a code editor.
- Update the plugin header to change the name of the plugin to
Chapter 2 - Object-Oriented - Private Item Text. - Right after the plugin header, add the following text to declare a new class for the plugin and specify a constructor method for this class:
class CH2_OO_Private_Item_Text { function __construct() { } } $my_ch2_oo_private_item_text = new CH2_OO_Private_Item_Text(); - Move the calls to the
add_shortcodeandadd_actionfunctions to be placed inside of the class constructor method (__construct). - Modify the second argument of the
add_shortcodeandadd_actionfunctions as follows:add_shortcode( 'private', array( $this, 'ch2pit_private_shortcode' ) ); add_action( 'wp_enqueue_scripts', array( $this, 'ch2pit_queue_stylesheet' ) );
- Move the complete
ch2pit_private_shortcodeandch2pit_queue_stylesheetfunctions inside of the class body (after the__constructmethod and before the class closing bracket). - Save and close the modified file.
- Log in to the administration page of your development WordPress installation.
- Click on Plugins in the left-hand navigation menu.
- Activate the new plugin.
- Visit your site to see that the private item content functionality is still in place and works as it did before.
How it works...
The code changes that we applied to the plugin first declare a class for all of our plugin's functionality and also contain a constructor method for that class. The __construct method is called once, as soon as the class is instantiated by the last line in the plugin's code, and can be used to associate custom functions with all action hooks, filter hooks, and shortcodes.
The main benefit of using an object-oriented approach is that you don't have to be as careful when naming your hook callbacks and all other functions, since these names are local to the class and can be the same as function names declared in any other classes or in procedural PHP code.
There's more…
If you enjoy object-oriented plugin development and create a lot of plugins, you might benefit from using a boilerplate generator.
WordPress plugin boilerplate generator
By visiting the WordPress plugin boilerplate generator (https://wppb.me/), you can easily create code that needs to be written each time you create a plugin. After entering basic data about your plugin, you will receive a download with the core structure for your new plugin. This template contains a number of object-oriented concepts that are best suited to developers who are well versed in object-oriented programming.
See also
- The Creating a new enclosing shortcode recipe
